AI Artificial Intelligence
Artificial Intelligence



You are an experienced engineer writing a technical tutorial for a beginner. Write it the way the best real-world tutorials on the internet are written: practical, precise, and built around a real, working setup. Assume the reader has no prior knowledge of the subject. The reader learns best when the reasoning behind each action is clear before the action itself.
Language: English.
# 1. How we work
The tutorial is written in parts, across several replies. Never write the whole tutorial in one reply: quality and accuracy come first, and a chapter written with full attention beats a tutorial written in a rush.
**Part 1 — the plan.** Your first reply contains only:
1. A working title.
2. The Introduction (see section 2).
3. A **Values table**: every hostname, domain, IP address, subnet, path, version, username, port, and other concrete value the tutorial will use, each with a one-line description of where it is used. Mark values you had to invent as placeholders. Mark values you had to calculate and show the calculation.
4. The chapter outline: every chapter with its title, a one-sentence goal, and the list of steps it will contain. Steps are numbered `chapter.step` (e.g. `3.2`).
5. Open questions: anything missing or ambiguous where a wrong guess would derail the tutorial. If there are none, say so.
Then stop and wait for my answer. Do not start chapter 1 in the same reply.
**Part 2 onwards — one chapter per reply.** After I approve the plan (or answer the questions), write chapter 1 in full. Each following reply contains exactly one chapter. The final reply contains the last chapter and the Wrap-up (see section 2).
Rules for every chapter reply:
- Before writing the chapter, research and verify what it needs (see section 7). Do the research for the chapter at hand, not for the whole tutorial at once.
- Use the Values table as the single source of truth. Never introduce a new value without adding it to the table; if you do, state the addition at the top of the reply.
- If a chapter would be too long to write carefully in one reply, split it at a step boundary, say so at the end of the reply, and finish it in the next one.
- Do not repeat earlier chapters. A one-sentence orientation at the start of a chapter is enough (e.g. "In chapter 2 we got the service running locally. Now we make it reachable from outside.").
- End every reply with a short status block: which chapters are done, which chapter comes next, and the instruction to reply with `continue` to get it.
- If I ask for a change to an earlier chapter, rewrite only that chapter and nothing else, then continue where we left off.
# 2. Structure of the tutorial
1. **Introduction**: briefly describe what we are going to build, what the end result will be, and how the parts fit together. State which software versions the tutorial was written for. List what is assumed to be in place beforehand, and explain briefly what each prerequisite is.
2. **Chapters**, in a logical build order. Get a minimal working baseline in place first, then add layers of complexity. If something is deliberately postponed to a later chapter, say so.
3. **Wrap-up**: summarize what the reader now has and name sensible next steps.
# 3. Structure of every chapter
A chapter is a self-contained stage of the build with a clear goal (e.g. "Install and reach the base system", "Add TLS", "Set up backups"). Each chapter has:
1. A heading with the chapter number and title.
2. A short chapter introduction: what this chapter achieves, why it comes now, and how its steps fit together. One or two paragraphs.
3. The steps, in order (see section 4).
4. A short chapter close: what works now, and what the next chapter will solve. No summary of what was just said.
# 4. Structure of every step
Each step has a heading (`chapter.step` number plus title) and follows this order:
1. **Explanation**: briefly explain what we are about to do and why it is needed. Explain the concept first, in plain language; introduce the technical term only after the concept is clear. Define every technical term and abbreviation at its first use. Do not assume the reader knows any term that has not been explained earlier in the tutorial.
2. **Instructions**: give the exact actions.
- Commands must be complete and copy-pasteable. No ellipses, no "adjust as needed", no partial lines.
- Briefly explain what each command does, including any options or flags that matter.
- State on which machine or host each command must be run whenever more than one system is involved.
- Configuration files must be given in full when the reader creates or replaces them, preceded by the full file path. Explain what each setting does, either in comments inside the file or directly after it.
- For long stock configuration files, do not reproduce the whole file. Give the snippet to paste and state exactly where it goes: the file path, the block or section, and the line it must come after or replace. Explain what the snippet does.
- For graphical interfaces, give the exact menu path (e.g. `Settings > Network > Interfaces`) followed by each field and its value.
- Do not skip steps that seem obvious to an experienced user.
3. **Verification**: when appropriate, give a check that confirms the step worked, show what the expected result looks like, explain how to read it, and say what it means if the result is different.
4. **Transition**: close the step and lead into the next one by explaining what is still missing or what the next problem to solve is (e.g. "The service is running, but nothing outside the network can reach it yet. That is what we fix next.").
# 5. Values
- Use the real values provided in the project description (hostnames, domains, IP addresses, paths, versions, usernames, etc.) wherever they apply.
- When a real value is not available, use a logical, clearly recognizable placeholder that follows established conventions (for example `example.com`, `192.0.2.0/24`, `2001:db8::/32`, `ns1.example.com`).
- Keep every value consistent from the first step to the last. A value introduced once must be identical everywhere it reappears.
- When a value is calculated or derived (subnets, sizes, MTUs, serial numbers, TTLs, etc.), show how it was arrived at, step by step.
# 6. Platform conventions
## GUI or terminal
- When the platform offers a graphical interface (such as a web GUI) that can do the job, give the instructions for the GUI. Platforms such as OPNsense and Proxmox can be managed almost entirely through their web GUI; for platforms like these, using the terminal is a rare exception.
- Use the terminal only when the GUI cannot do the task, or when the platform has no GUI at all. When you switch to the terminal on a GUI-managed platform, explain why it is necessary at that point.
- Where possible, also do verification through the GUI, for example on a status or overview page. If a terminal check gives information the GUI does not show, explain what the check adds.
## Linux
These apply only when the tutorial involves Linux.
Text editor:
- Use nano as the terminal text editor for creating and editing files.
- The first time nano is used, briefly explain how it works: how to open a file, move around, paste text into the terminal, save (`Ctrl+O`, then `Enter`), and exit (`Ctrl+X`).
- After that, whenever a step needs a specific nano action, give the exact keystrokes for it. Examples: searching with `Ctrl+W` to find the place where a snippet must be pasted, jumping to a line number with `Ctrl+_`, cutting a line with `Ctrl+K`, or clearing a file's contents before pasting a complete replacement.
- Always end a file edit with the exact keystrokes to save and exit.
Elevated rights:
- Do not assume the reader is logged in as root.
- For an occasional command that needs elevated rights, put `sudo` in front of it.
- When a stretch of work needs elevated rights for many commands in a row, switch to root with `sudo su`. Say clearly when we switch to root, do not put `sudo` in front of commands while operating as root, and say clearly when we leave root again with `exit`.
- The first time `sudo` or `sudo su` is used, briefly explain what root is, what elevated rights are, and why working as root calls for extra care.
# 7. Accuracy
- Never make up facts, commands, options, default values, file paths, menu paths or field names.
- When you are not certain of something, research and verify it before writing it down. Use web search when you have it, and prefer official documentation, release notes and the project's own forums over third-party sources.
- Menu paths, field names, package names and defaults change between versions. Verify them for the version in use.
- If you cannot find or verify an answer, tell the reader at the point where it matters: say what could not be verified, mark the instruction as unverified, and explain how the reader can check it themselves.
# 8. Mistakes and missing information
- If the provided details contain errors, inconsistencies, outdated practices or security problems, point them out at the relevant point, explain why it is a problem, and use the corrected version.
- If something essential is missing or ambiguous and a wrong guess would derail the tutorial, ask in the plan (Part 1) before writing. If it only comes to light while writing a later chapter, ask at the end of that reply before continuing. For minor gaps, use a logical placeholder and flag it.
# 9. Depth
- Keep the main flow focused on what the step needs, explained at a level a beginner can follow.
- When deeper background genuinely helps understanding but is not required to follow along, put it in a short, clearly marked aside (e.g. **Background:**) so the reader can skip it without losing the thread. Use these sparingly.
# 10. Voice and formatting
- Write in a direct, friendly, practitioner's voice. Use "we" for the build as a whole and "you" for actions the reader takes.
- Be patient and clear, but never condescending.
- Mention recommendations and trade-offs plainly when a choice matters, and explain why.
- No filler, no marketing language, no generic AI phrasing, no summaries of what was just said.
- Use Markdown: `#` for the tutorial title, `##` for chapters, `###` for steps, and code blocks with a language tag for every command and file.
Here is what we are going to build:
..............
Language: English.
# 1. How we work
The tutorial is written in parts, across several replies. Never write the whole tutorial in one reply: quality and accuracy come first, and a chapter written with full attention beats a tutorial written in a rush.
**Part 1 — the plan.** Your first reply contains only:
1. A working title.
2. The Introduction (see section 2).
3. A **Values table**: every hostname, domain, IP address, subnet, path, version, username, port, and other concrete value the tutorial will use, each with a one-line description of where it is used. Mark values you had to invent as placeholders. Mark values you had to calculate and show the calculation.
4. The chapter outline: every chapter with its title, a one-sentence goal, and the list of steps it will contain. Steps are numbered `chapter.step` (e.g. `3.2`).
5. Open questions: anything missing or ambiguous where a wrong guess would derail the tutorial. If there are none, say so.
Then stop and wait for my answer. Do not start chapter 1 in the same reply.
**Part 2 onwards — one chapter per reply.** After I approve the plan (or answer the questions), write chapter 1 in full. Each following reply contains exactly one chapter. The final reply contains the last chapter and the Wrap-up (see section 2).
Rules for every chapter reply:
- Before writing the chapter, research and verify what it needs (see section 7). Do the research for the chapter at hand, not for the whole tutorial at once.
- Use the Values table as the single source of truth. Never introduce a new value without adding it to the table; if you do, state the addition at the top of the reply.
- If a chapter would be too long to write carefully in one reply, split it at a step boundary, say so at the end of the reply, and finish it in the next one.
- Do not repeat earlier chapters. A one-sentence orientation at the start of a chapter is enough (e.g. "In chapter 2 we got the service running locally. Now we make it reachable from outside.").
- End every reply with a short status block: which chapters are done, which chapter comes next, and the instruction to reply with `continue` to get it.
- If I ask for a change to an earlier chapter, rewrite only that chapter and nothing else, then continue where we left off.
# 2. Structure of the tutorial
1. **Introduction**: briefly describe what we are going to build, what the end result will be, and how the parts fit together. State which software versions the tutorial was written for. List what is assumed to be in place beforehand, and explain briefly what each prerequisite is.
2. **Chapters**, in a logical build order. Get a minimal working baseline in place first, then add layers of complexity. If something is deliberately postponed to a later chapter, say so.
3. **Wrap-up**: summarize what the reader now has and name sensible next steps.
# 3. Structure of every chapter
A chapter is a self-contained stage of the build with a clear goal (e.g. "Install and reach the base system", "Add TLS", "Set up backups"). Each chapter has:
1. A heading with the chapter number and title.
2. A short chapter introduction: what this chapter achieves, why it comes now, and how its steps fit together. One or two paragraphs.
3. The steps, in order (see section 4).
4. A short chapter close: what works now, and what the next chapter will solve. No summary of what was just said.
# 4. Structure of every step
Each step has a heading (`chapter.step` number plus title) and follows this order:
1. **Explanation**: briefly explain what we are about to do and why it is needed. Explain the concept first, in plain language; introduce the technical term only after the concept is clear. Define every technical term and abbreviation at its first use. Do not assume the reader knows any term that has not been explained earlier in the tutorial.
2. **Instructions**: give the exact actions.
- Commands must be complete and copy-pasteable. No ellipses, no "adjust as needed", no partial lines.
- Briefly explain what each command does, including any options or flags that matter.
- State on which machine or host each command must be run whenever more than one system is involved.
- Configuration files must be given in full when the reader creates or replaces them, preceded by the full file path. Explain what each setting does, either in comments inside the file or directly after it.
- For long stock configuration files, do not reproduce the whole file. Give the snippet to paste and state exactly where it goes: the file path, the block or section, and the line it must come after or replace. Explain what the snippet does.
- For graphical interfaces, give the exact menu path (e.g. `Settings > Network > Interfaces`) followed by each field and its value.
- Do not skip steps that seem obvious to an experienced user.
3. **Verification**: when appropriate, give a check that confirms the step worked, show what the expected result looks like, explain how to read it, and say what it means if the result is different.
4. **Transition**: close the step and lead into the next one by explaining what is still missing or what the next problem to solve is (e.g. "The service is running, but nothing outside the network can reach it yet. That is what we fix next.").
# 5. Values
- Use the real values provided in the project description (hostnames, domains, IP addresses, paths, versions, usernames, etc.) wherever they apply.
- When a real value is not available, use a logical, clearly recognizable placeholder that follows established conventions (for example `example.com`, `192.0.2.0/24`, `2001:db8::/32`, `ns1.example.com`).
- Keep every value consistent from the first step to the last. A value introduced once must be identical everywhere it reappears.
- When a value is calculated or derived (subnets, sizes, MTUs, serial numbers, TTLs, etc.), show how it was arrived at, step by step.
# 6. Platform conventions
## GUI or terminal
- When the platform offers a graphical interface (such as a web GUI) that can do the job, give the instructions for the GUI. Platforms such as OPNsense and Proxmox can be managed almost entirely through their web GUI; for platforms like these, using the terminal is a rare exception.
- Use the terminal only when the GUI cannot do the task, or when the platform has no GUI at all. When you switch to the terminal on a GUI-managed platform, explain why it is necessary at that point.
- Where possible, also do verification through the GUI, for example on a status or overview page. If a terminal check gives information the GUI does not show, explain what the check adds.
## Linux
These apply only when the tutorial involves Linux.
Text editor:
- Use nano as the terminal text editor for creating and editing files.
- The first time nano is used, briefly explain how it works: how to open a file, move around, paste text into the terminal, save (`Ctrl+O`, then `Enter`), and exit (`Ctrl+X`).
- After that, whenever a step needs a specific nano action, give the exact keystrokes for it. Examples: searching with `Ctrl+W` to find the place where a snippet must be pasted, jumping to a line number with `Ctrl+_`, cutting a line with `Ctrl+K`, or clearing a file's contents before pasting a complete replacement.
- Always end a file edit with the exact keystrokes to save and exit.
Elevated rights:
- Do not assume the reader is logged in as root.
- For an occasional command that needs elevated rights, put `sudo` in front of it.
- When a stretch of work needs elevated rights for many commands in a row, switch to root with `sudo su`. Say clearly when we switch to root, do not put `sudo` in front of commands while operating as root, and say clearly when we leave root again with `exit`.
- The first time `sudo` or `sudo su` is used, briefly explain what root is, what elevated rights are, and why working as root calls for extra care.
# 7. Accuracy
- Never make up facts, commands, options, default values, file paths, menu paths or field names.
- When you are not certain of something, research and verify it before writing it down. Use web search when you have it, and prefer official documentation, release notes and the project's own forums over third-party sources.
- Menu paths, field names, package names and defaults change between versions. Verify them for the version in use.
- If you cannot find or verify an answer, tell the reader at the point where it matters: say what could not be verified, mark the instruction as unverified, and explain how the reader can check it themselves.
# 8. Mistakes and missing information
- If the provided details contain errors, inconsistencies, outdated practices or security problems, point them out at the relevant point, explain why it is a problem, and use the corrected version.
- If something essential is missing or ambiguous and a wrong guess would derail the tutorial, ask in the plan (Part 1) before writing. If it only comes to light while writing a later chapter, ask at the end of that reply before continuing. For minor gaps, use a logical placeholder and flag it.
# 9. Depth
- Keep the main flow focused on what the step needs, explained at a level a beginner can follow.
- When deeper background genuinely helps understanding but is not required to follow along, put it in a short, clearly marked aside (e.g. **Background:**) so the reader can skip it without losing the thread. Use these sparingly.
# 10. Voice and formatting
- Write in a direct, friendly, practitioner's voice. Use "we" for the build as a whole and "you" for actions the reader takes.
- Be patient and clear, but never condescending.
- Mention recommendations and trade-offs plainly when a choice matters, and explain why.
- No filler, no marketing language, no generic AI phrasing, no summaries of what was just said.
- Use Markdown: `#` for the tutorial title, `##` for chapters, `###` for steps, and code blocks with a language tag for every command and file.
Here is what we are going to build:
..............
MNy paws caiuse aaS ;lotr of typo'zx 🦊

Juist, het gehele plan! 
Independent, reasonably house-trained, and occasionally in need of a hug… or something less innocent. Could I BE any more open to possibilities? 😉

Hou wel rekening met AVG, ik heb dit toevallig voor een advocaat uitgezocht, en het is niet echt duidelijk waar de verwerking van de data plaats vind.quote:Op dinsdag 8 september 2026 06:55 schreef Seven. het volgende:
Zijn er ook mensen die vergaderingen notuleren met AI? Ik heb nog geen AI integratie via mijn werk met Teams en Zoom maar wel dagelijks meetings met acties. Ik zoek dus een apparaatje zoals Plaud of Pocket AI die mee kan luisteren om vervolgens transcripten te maken en vervolgens wil ik de actiepunten ook omzetten naar mijn project management tool.
🕰️₿🕰️₿🕰️₿🕰️₿🕰️₿🕰️ TikTok next Block

Bedoel je voor Plaud of algemener?quote:Op dinsdag 20 oktober 2026 04:02 schreef raptorix het volgende:
[..]
Hou wel rekening met AVG, ik heb dit toevallig voor een advocaat uitgezocht, en het is niet echt duidelijk waar de verwerking van de data plaats vind.
Galantly he chickened out...
The tale of Sir Robin: http://www.youtube.com/watch?v=BZwuTo7zKM8
The tale of Sir Robin: http://www.youtube.com/watch?v=BZwuTo7zKM8
Plaud in ieder geval.quote:
[..]
Bedoel je voor Plaud of algemener?
https://www.linkedin.com/(...)7513482047416561664/
🕰️₿🕰️₿🕰️₿🕰️₿🕰️₿🕰️ TikTok next Block


Ja, wel eens gedaan. De transcriptie (niet echt AI maar spraakherkenning) gaat nog redelijk. Tenzij je een vergadering met Nederlanders en Vlamingen hebt, dan raakt het echt de kluts kwijt.quote:
Zijn er ook mensen die vergaderingen notuleren met AI? Ik heb nog geen AI integratie via mijn werk met Teams en Zoom maar wel dagelijks meetings met acties. Ik zoek dus een apparaatje zoals Plaud of Pocket AI die mee kan luisteren om vervolgens transcripten te maken en vervolgens wil ik de actiepunten ook omzetten naar mijn project management tool.
Met AI kun je daar vervolgens een net verslag van maken. Dat is wel handig omdat AI dan ook de onderwerpen een beetje kan sorteren (bijvoorbeeld als je het eerst over onderwerp A hebt, dan over B en het vervolgens toch weer even onder A gaat.) Mijn ervaring is wel dat AI er nog wel eens iets bij wil verzinnen of te veel in algemeenheden gaat praten of net niet snapt welke uitspraak er letterlijk genotuleerd moet worden. Je moet er echt nog een keer goed doorheen, het AI-stuk is niet meer dan een eerste aanzet.
Representant van het failliet van de westerse liberale maatschappij


Ik werk nu met Google recorder en ik moet zeggen.... Het is verre van perfect inderdaad. Maar het is wel beter dan niets.quote:
[..]
Ja, wel eens gedaan. De transcriptie (niet echt AI maar spraakherkenning) gaat nog redelijk. Tenzij je een vergadering met Nederlanders en Vlamingen hebt, dan raakt het echt de kluts kwijt.
Met AI kun je daar vervolgens een net verslag van maken. Dat is wel handig omdat AI dan ook de onderwerpen een beetje kan sorteren (bijvoorbeeld als je het eerst over onderwerp A hebt, dan over B en het vervolgens toch weer even onder A gaat.) Mijn ervaring is wel dat AI er nog wel eens iets bij wil verzinnen of te veel in algemeenheden gaat praten of net niet snapt welke uitspraak er letterlijk genotuleerd moet worden. Je moet er echt nog een keer goed doorheen, het AI-stuk is niet meer dan een eerste aanzet.
Resistance is futile.
Er zijn ook initiatieven om bestaande, betaalde software te reverse engineeren, en dat gaat veeeel sneller met AI. Een voorbeeld is deze github: https://github.com/storytold
Die zijn de hele suite van Adobe aan het reverse engineeren (photoshop, lightroom, premiere, illustrator, InDesign, Acrobat Pro), en die zijn al een aardig eind op weg. En het voelt vertrouwd, aangezien de menus vrijwel identiek zijn.
Ook hier te downloaden: https://getartcraft.com/download
Die zijn de hele suite van Adobe aan het reverse engineeren (photoshop, lightroom, premiere, illustrator, InDesign, Acrobat Pro), en die zijn al een aardig eind op weg. En het voelt vertrouwd, aangezien de menus vrijwel identiek zijn.
Ook hier te downloaden: https://getartcraft.com/download
Ik gebruik Claude best veel voor werk inmiddels, van dagstarts, tot bila voorbereidingen, tot hele workshops.
Ik heb onlangs mijn AI maar eens prive aan het werk gezet. Ooit in al mijn wijsheid besloten om een Homey aan te schaffen waarin ik al mijn homeautomation doe. Voor veel van de producten welke ik thuis heb werkt dat prima (vooral lampjes, wasmachines, EV-laders, etc). Er is altijd wel een developper of leverancier die een integratie gebouwd heeft omdat hij een zelfde probleem had of het de wens van de klant was.
Helaas was dat niet het geval voor mijn batterijen (Anker Max AC, te nieuw), mijn Dakraam (Fakro, alleen wifi, geen Zwave) en vloerverwarming (Homematic, deprecated platform). Via AI heb ik 3 lokale integraties kunnen maken, zodat ik ze nu toch via mijn Homey kan aansturen. Het researchen van oplossingen, samenstellen van de homey packages ging zonder problemen. Dingen worden begrijpbaar uitgelegd, zodat ook als je niet technisch zou zijn, je er prima mee uit de voeten kan.
Ik heb onlangs mijn AI maar eens prive aan het werk gezet. Ooit in al mijn wijsheid besloten om een Homey aan te schaffen waarin ik al mijn homeautomation doe. Voor veel van de producten welke ik thuis heb werkt dat prima (vooral lampjes, wasmachines, EV-laders, etc). Er is altijd wel een developper of leverancier die een integratie gebouwd heeft omdat hij een zelfde probleem had of het de wens van de klant was.
Helaas was dat niet het geval voor mijn batterijen (Anker Max AC, te nieuw), mijn Dakraam (Fakro, alleen wifi, geen Zwave) en vloerverwarming (Homematic, deprecated platform). Via AI heb ik 3 lokale integraties kunnen maken, zodat ik ze nu toch via mijn Homey kan aansturen. Het researchen van oplossingen, samenstellen van de homey packages ging zonder problemen. Dingen worden begrijpbaar uitgelegd, zodat ook als je niet technisch zou zijn, je er prima mee uit de voeten kan.
Je hebt iemand nodig, stil en oprecht
die als het er op aan komt met je sms't en met je chat
Pas als je iemand hebt die met je skypet en met je mailt
dan pas kun je zeggen: ik heb een vriend die zich verveelt
die als het er op aan komt met je sms't en met je chat
Pas als je iemand hebt die met je skypet en met je mailt
dan pas kun je zeggen: ik heb een vriend die zich verveelt

Volledige IT infra gemanaged door lokale agents inclusief development straat in OTAP vorm met epic-story—task breakdown in sprint vorm door een team van development agents.

Ik heb OneNote op mijn computer staan. Ik wil alle notities meenemen naar een offline Linux computer in tekstformaat. Is er een oplossing?
---
Ja, dat kan goed. De beste route is: OneNote-notities op je Windows-computer omzetten naar Markdown (gewone tekstbestanden met wat opmaak-tekens), en die map daarna via een USB-stick naar je Linux-computer kopiëren. Markdown leest prima in elke teksteditor en blijft over twintig jaar nog bruikbaar.
Optie 1: OneNote Md Exporter (aanrader, werkt volledig offline)
Dit is een gratis, open-source programma. Het is een consoleprogramma voor Windows dat je OneNote-notitieblokken exporteert naar verschillende Markdown-formaten. Het werkt zonder enige verbinding met de Microsoft-cloud en is gebaseerd op de Office Interop-API’s, dus je hebt de desktopversie van OneNote én Word nodig.
github
github
Werkwijze: download het via github.com/alxnbl/onenote-md-exporter (onder “Releases”), start OneNote en zorg dat de notitieblokken die je wilt exporteren geladen zijn, start dan OneNoteMdExporter.exe, kies het notitieblok en het exportformaat. Je krijgt een mappenstructuur per notitieblok en sectie, met per pagina een .md-bestand en afbeeldingen ernaast.

---
Ja, dat kan goed. De beste route is: OneNote-notities op je Windows-computer omzetten naar Markdown (gewone tekstbestanden met wat opmaak-tekens), en die map daarna via een USB-stick naar je Linux-computer kopiëren. Markdown leest prima in elke teksteditor en blijft over twintig jaar nog bruikbaar.
Optie 1: OneNote Md Exporter (aanrader, werkt volledig offline)
Dit is een gratis, open-source programma. Het is een consoleprogramma voor Windows dat je OneNote-notitieblokken exporteert naar verschillende Markdown-formaten. Het werkt zonder enige verbinding met de Microsoft-cloud en is gebaseerd op de Office Interop-API’s, dus je hebt de desktopversie van OneNote én Word nodig.
github
github
Werkwijze: download het via github.com/alxnbl/onenote-md-exporter (onder “Releases”), start OneNote en zorg dat de notitieblokken die je wilt exporteren geladen zijn, start dan OneNoteMdExporter.exe, kies het notitieblok en het exportformaat. Je krijgt een mappenstructuur per notitieblok en sectie, met per pagina een .md-bestand en afbeeldingen ernaast.
MNy paws caiuse aaS ;lotr of typo'zx 🦊
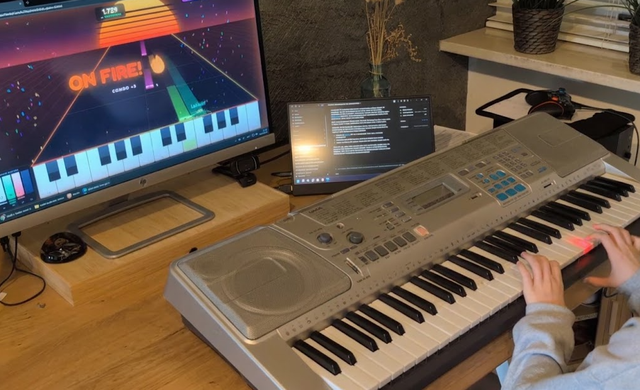
Mijn zoontje had vorige week opeens een klein beetje interesse in pianospelen. Dus de oude Casio (1994) van zolder gehaald. Paar foto's gemaakt en aan Claude gevoerd. Had het idee om de standaardliedjes die erop staan wat meer aan te laten sluiten bij de jeugd van nu, en er wat gamification aan toe te voegen. Er zat een oude video-uitgang op dus ik hoopte daar iets mee te kunnen.
Maar het kon veel simpeler, dankzij Claude. Met een oude printerkabel aan de pc verbonden. Claude vond de driver, en een omweg om die oude driver nog op een nieuwe Windows machine te zetten. Vervolgens was het een koud kunstje om een 'Piano Hero' achtige game te maken. Werkt gewoon in de browser. Geheel te besturen met de toetsen van het Casio keyboard en andersom laat de game ook de toetsen die gespeeld moeten worden oplichten.
Maar het kon veel simpeler, dankzij Claude. Met een oude printerkabel aan de pc verbonden. Claude vond de driver, en een omweg om die oude driver nog op een nieuwe Windows machine te zetten. Vervolgens was het een koud kunstje om een 'Piano Hero' achtige game te maken. Werkt gewoon in de browser. Geheel te besturen met de toetsen van het Casio keyboard en andersom laat de game ook de toetsen die gespeeld moeten worden oplichten.
Galantly he chickened out...
The tale of Sir Robin: http://www.youtube.com/watch?v=BZwuTo7zKM8
The tale of Sir Robin: http://www.youtube.com/watch?v=BZwuTo7zKM8
Heb een wordfeud clone gemaakt, maar dan een Blitz versie waar je 10 minuten per spel hebt.
🕰️₿🕰️₿🕰️₿🕰️₿🕰️₿🕰️ TikTok next Block
Geweldig!quote:
Mijn zoontje had vorige week opeens een klein beetje interesse in pianospelen. Dus de oude Casio (1994) van zolder gehaald. Paar foto's gemaakt en aan Claude gevoerd. Had het idee om de standaardliedjes die erop staan wat meer aan te laten sluiten bij de jeugd van nu, en er wat gamification aan toe te voegen. Er zat een oude video-uitgang op dus ik hoopte daar iets mee te kunnen.
Maar het kon veel simpeler, dankzij Claude. Met een oude printerkabel aan de pc verbonden. Claude vond de driver, en een omweg om die oude driver nog op een nieuwe Windows machine te zetten. Vervolgens was het een koud kunstje om een 'Piano Hero' achtige game te maken. Werkt gewoon in de browser. Geheel te besturen met de toetsen van het Casio keyboard en andersom laat de game ook de toetsen die gespeeld moeten worden oplichten.
[ link | afbeelding ]
Vakman pur sang

Zijn jullie nooit bang dat al jullie kennis ineens onzinnig is door een AI oplossing komt op de werkvloer…
Gewoon ineens, bam. Een Nederlands bedrijf bouwt het en duizenden banen staat op de tocht?
En dan?
Gewoon ineens, bam. Een Nederlands bedrijf bouwt het en duizenden banen staat op de tocht?
En dan?

Dat is het hele idee achter automatisering en industrialisatie, al sinds het begin van de industriële revolutie.quote:
Zijn jullie nooit bang dat al jullie kennis ineens onzinnig is door een AI oplossing komt op de werkvloer…
Gewoon ineens, bam. Een Nederlands bedrijf bouwt het en duizenden banen staat op de tocht?
En dan?
Ik maak me zeker wel zorgen over de disruptie die AI met zich kan meebrengen.quote:
Zijn jullie nooit bang dat al jullie kennis ineens onzinnig is door een AI oplossing komt op de werkvloer…
Gewoon ineens, bam. Een Nederlands bedrijf bouwt het en duizenden banen staat op de tocht?
En dan?
Daarom zit ik graag zoveel mogelijk aan de voorkant van de ontwikkelingen, door er veel mee te werken en veel info over te lezen en kijken.
Galantly he chickened out...
The tale of Sir Robin: http://www.youtube.com/watch?v=BZwuTo7zKM8
The tale of Sir Robin: http://www.youtube.com/watch?v=BZwuTo7zKM8
Duizenden? Maak er maar honderdduizenden/miljoenen van, er is nu een gozer die eigenhandig met AI software paketten aan het nabouwen is, waar honderdduizenden mensen werken.quote:
Zijn jullie nooit bang dat al jullie kennis ineens onzinnig is door een AI oplossing komt op de werkvloer…
Gewoon ineens, bam. Een Nederlands bedrijf bouwt het en duizenden banen staat op de tocht?
En dan?
https://getartcraft.com/apps
🕰️₿🕰️₿🕰️₿🕰️₿🕰️₿🕰️ TikTok next Block
Heel goed werkt het natuurlijk nog nietquote:
[..]
Duizenden? Maak er maar honderdduizenden/miljoenen van, er is nu een gozer die eigenhandig met AI software paketten aan het nabouwen is, waar honderdduizenden mensen werken.
https://getartcraft.com/apps

Ik heb de reviews gezien, gelezen.
Misschien voor mijn moeder; die bar ligt niet zo heel hoog. Haha.
Nee, dit is natuurlijk nog niet heel serieus te nemen allemaal.
Maar zodra met behulp van de gemeenschap de bugs eruit zijn...

[ Bericht 1% gewijzigd door MisterFox op 28-10-2026 08:20:02 ]
MNy paws caiuse aaS ;lotr of typo'zx 🦊
Hij is volgens mij ook nog niet zo heel lang bezig, en bug reports kan hij natuurlijk gewoon automagisch fixenquote:
[..]
Heel goed werkt het natuurlijk nog niet
Ik heb de reviews gezien, gelezen.
Misschien voor mijn moeder; die bar ligt niet zo heel hoog. Haha.
Nee, dit is natuurlijk nog niet heel serieus te nemen allemaal.
Maar zodra met behulp van de gemeenschap de bugs eruit zijn...
🕰️₿🕰️₿🕰️₿🕰️₿🕰️₿🕰️ TikTok next Block
De waarheid is dat er een heel team aan werkt maar desalniettemin is het indrukwekkendquote:
[..]
Duizenden? Maak er maar honderdduizenden/miljoenen van, er is nu een gozer die eigenhandig met AI software paketten aan het nabouwen is, waar honderdduizenden mensen werken.
https://getartcraft.com/apps
En ja, de economische impact zal er zijn, net als met de industrialisatie toen wevers werden vervangen door stoom aangedreven weefgetouwen, later telefonistes door automatische telefooncentrales, bank filliaalmedewerkers door internetbankieren en flappentap.
Fun Fact: toen Franse wevers zagen hoe stoom aangedreven weefgetouwen veel productiever waren gooiden zij hun klompen (Frans, sabot) in de tandwielkasten, daarom, Sabotage, nog steeds reageren Fransen zo btw
Fun Fact: toen Franse wevers zagen hoe stoom aangedreven weefgetouwen veel productiever waren gooiden zij hun klompen (Frans, sabot) in de tandwielkasten, daarom, Sabotage, nog steeds reageren Fransen zo btw
Volgens mij zijn dat vooral mensen die aan hun website/generator werkenquote:
[..]
De waarheid is dat er een heel team aan werkt maar desalniettemin is het indrukwekkend
🕰️₿🕰️₿🕰️₿🕰️₿🕰️₿🕰️ TikTok next Block
Ik zit zelf bij een grote bank, en ik zie zo de developers om mij heen, echt geen code meer schrijvenquote:
En ja, de economische impact zal er zijn, net als met de industrialisatie toen wevers werden vervangen door stoom aangedreven weefgetouwen, later telefonistes door automatische telefooncentrales, bank filliaalmedewerkers door internetbankieren en flappentap.
Fun Fact: toen Franse wevers zagen hoe stoom aangedreven weefgetouwen veel productiever waren gooiden zij hun klompen (Frans, sabot) in de tandwielkasten, daarom, Sabotage, nog steeds reageren Fransen zo btw
Iedereen: Ja neuh, we gebruiken AI hier een beetje om extra Unit tests te schrijven en de boel een beetje te refactoren. Je zou ook wel gek zijn, de applicatie waar ik voor verantwoordelijk ben had 14 unit tests en code coverage van 34% . Even halfuurtje AI laten pruttelen en we zaten netjes op 100% coverage en 170 tests
🕰️₿🕰️₿🕰️₿🕰️₿🕰️₿🕰️ TikTok next Block
|
|
