
Hierbij een overzichts topic voor Tips & Tricks voor Windows 7. Zeker nu vlak na de release zijn er een hoop vragen maar ook in de toekomst zal dit hopelijk makkelijk zijn als naslag werk.
Het is vooral mijn bedoeling om dit een schoon en overzichtelijk topic te houden zodat iedereen snel kan vinden wat ze zoeken.
Waar is dit topic voor
* Het delen van tips, tricks en tweaks voor Windows 7 (en eventueel Vista maar vermeld dat dan even apart in de titel)
Waar is dit topic niet voor
* Discussie over het nut van een tip of tweak
* Algemene vragen over Windows 7 want daar is een topic over (zie onderaan de OP)
* Bashen op users, op windows, op de tricks, etc (ook daar zijn andere topics voor.
* Het zal als het goed is een langzaamlopend topic zijn dus liever een bookmark inplaats van de beruchte tvp.
* Vragen en opmerkingen kunnen het beste in het Digital Corner feedback topic (zie link onderaan)
Als je zelf een tip/trick of tweak hebt dan is deze uiteraard van harte welkom. We kunnen de modjes dan verzoeken om deze toe te voegen in de OP.
Probeer ze het liefste wel duidelijk op te bouwen met een stap voor stap overzicht en het liefste ondersteund met screenshots. Op die manier hebben mensen met minder computer ervaring er ook iets aan.
Bijna elke tip/trick is nuttig en ze hoeven niet heel hoogstaand te zijn. Als ze in het engels staan ergens hoef je ook echt geen moeite doen om ze te vertalen. Mensen die Engels niet begrijpen kunnen wel een gratis online translator gebruiken.
Ik heb niet alle tips en tricks getest en ik geef dus geen garantie dat ze werken.
De tips/tricks die er nu staan heb ik uiteraard niet zelf verzonnen maar zijn schaamteloos over genomen van andere websites.
Overzicht van de tricks:
* How to get the old XP/Vista taskbar back in Windows 7
* Windows 7 Upgrade Advisor
* Customize your icons with Windows 7 high-resolution device icons
* How to check software or hardware for Windows 7 compatibility online
* How to customize the logon screen for Windows 7
* How to enable the Quick Launch bar in Windows 7 (methode 2)
* How to really pin the Show Desktop to Taskbar in Windows 7
* How to Uninstall Internet Explorer 8 in Windows 7 (almost)
* Tweak Hundreds of Windows 7 Settings With Ultimate Windows Tweaker
* Speed up taskbar thumbnails by changing hover time in Windows 7
* Fix Aero Glass in Windows 7
* Fine Tune Windows 7 on Netbooks
* How to enable Dreamscene or Video Wallpaper in Windows 7
* How to minimize MSN Messenger to the system tray in Windows 7
* Slow torrents with Windows 7
How to easily download and install Windows 7 Language Packs (MUI packs)
Overige links
Windows 7 #13
Het grote Digital Corner FB topic
[ Bericht 5% gewijzigd door Jo0Lz op 07-11-2009 10:42:04 ]
How to change the Windows 7 Taskbar back to the XP/Vista style taskbar:
1) Right click on an open-area in the taskbar and select properties

2) From the taskbar buttons drop-down menu, choose Never Combine. You may also want to check the Use small icons box under Taskbar Appearance.

3) Press OK and now you have the old XP/Vista style taskbar.
With Windows 7 Upgrade Advisor you can detect automatically Information about your computer is your computer seven ready or not.
Before you run the Windows 7 Upgrade Advisor beta, be sure to plug in any USB devices or other devices such as printers, external hard drives, or scanners that are regularly used with the PC you’re evaluating.
The utility will work in Windows Vista and Windows XP and is available free for Download.

Link naar upgrade advisor:
http://www.microsoft.com/downloads/details.aspx?displaylang=nl&FamilyID=1b544e90-7659-4bd9-9e51-2497c146af15
One of the cool new features of Windows 7 is its ability to automatically find a high-resolution device icon that corresponds to your device. You can find these icons in action under Devices and Printers, which can be accessed via the Start menu. Most of the time, Windows downloads those icons directly from Microsoft when you install a new device. Icons are not available for every device, but most new devices will have a corresponding icon.

To access the icons, open an Explorer window and paste the following into the address bar:
quote:Click on the folder named after your region (mine says en-US) and you should see a list of folders for each device. Unfortunately, you would have to check each folder individually, then click on Device Information to access the icon for the device.%LOCALAPPDATA%\Microsoft\Device Metadata\dmrccache\

Additionally, you may access the default set of icons included with Windows 7 out-of-the-box using the following resource file
quote:%SystemRoot%\system32\DDOres.dll
Microsoft has put up an extremely useful site that will allow you to check your software and hardware for Windows 7 compatibility. The Windows 7 Compatibility Center tells you whether your software or hardware is compatible, and provides instructions for driver or utility download if necessary. Useful links such to different parts of the manufacturer’s website are also provided at your convenience.

Link: http://www.microsoft.com/windows/compatibility/en-us/default.aspx


Windows 7 now supports the ability to change the logon background screen without the use of any third-party software or hacks. The feature seems to have been intended for OEMs to customize.
This tweak only works for builds 7057 and up.
Toggling the ability to change the logon background screen can easily be done by changing the value of a specific registry key.
1) Download this file to Enable/Disable custom login backgrounds
http://windows7center.com(...)d_Registry_Tweak.rar
quote:If you want to edit the registry key manually, simply open the Start Menu and type regedit in the search bar.
Head to HKEY_LOCAL_MACHINE\Software\Microsoft\Windows\CurrentVersion\Authentication\LogonUI\Background
Check to see if a DWord value named OEMBackground exists and has a value of 1. If not, right click the white-space and create a DWORD Value for this.
2) The images for these custom backgrounds are to be placed in the following directory. Keep in mind that the file size must remain under 256kb.
quote:3) This directory may not exist by default, in which case, you would have to navigate to the directory below and create the info and backgrounds folders yourself.%windir%\system32\oobe\info\backgrounds
quote:4) These are the possible file names you can use for your images. backgroundDefault.jpg is loaded and set to stretch-to-fit when a resolution specific background (for example background1280�1024.jpg for my monitor) cannot be found.%windir%\system32\oobe\info\backgrounds
* backgroundDefault.jpg
* background768�1280.jpg (0.6)
* background900�1440.jpg (0.625)
* background960�1280.jpg (0.75)
* background1024�1280.jpg (0.8)
* background1280�1024.jpg (1.25)
* background1024�768.jpg (1.33-)
* background1280�960.jpg (1.33-)
* background1600�1200.jpg (1.33-)
* background1440�900.jpg (1.6)
* background1920�1200.jpg (1.6)
* background1280�768.jpg (1.66-)
* background1360�768.jpg (1.770833-)
5) To see if changes have taken into effect, you can simply log off then log back in, instead or rebooting your computer each time.

By default, Windows 7 doesn’t have the Quick Launch bar enabled. But some users may find that they really need the Quick Launch bar back like it was in Vista and XP. Windows 7 doesn’t give you any instant way to bring it back, but it is still possible.
1) Right click any empty area in your taskbar, and uncheck Lock the Taskbar.

2) Right click any empty area of your taskbar again, select Toolbars, then New Toolbar.

3) Copy the following address, and paste it into the address bar of Windows Explorer.
quote:%userprofile%AppDataRoamingMicrosoftInternet ExplorerQuick Launch

4) Select the Quick Launch folder, and click on Select Folder below. Do not double-click Quick Launch.

5) Now you’ll see Quick Launch in your taskbar. Since we previously unlocked the taskbar, you can place the Quick Launch bar anywhere you want by dragging it to the leftmost or rightmost corner of the taskbar.
6) You’ll want to hide the Quick Launch text and program titles as well. Right click the Quick Launch bar and deselect Show Text and Show Title.

And now you’ve got the Quick Launch bar that was in Vista and XP. Some of you might be happy to know that there is also a Show Desktop and Flip 3D icon.

[ Bericht 1% gewijzigd door Godtje op 03-11-2009 10:14:46 ]
you’ve just picked up Windows 7, you’re probably wondering where the Show Desktop button has gone. It’s actually now moved to the bottom right hand corner of the screen for quick access. Hovering your mouse over it will activate Aero Peek and allow you to preview the Desktop without actually going to it. This feature is good for taking a quick peek at any Gadgets you may have lying on your desktop.
But if you still want a “Show Desktop” icon in your taskbar, it’s possible. This guide will teach you how to pin Show Desktop properly into the taskbar, not the method that gives you a strange unaligned placement in the taskbar.

vs

he guide is actually not as long as it looks. I added a lot of pictures to guide you along the process.
How-to:
1) First, you need to pin an item you don’t actually want in the taskbar. I chose TweetDeck because it stays in the System Tray anyway.

2) Then you need to create your own Show Desktop icon. You can download the Icon here, or do it yourself.
http://windows7center.com/wp-content/desktop.rar
To do it yourself, open Notepad and paste the following code:
quote:[Shell]
Command=2
IconFile=explorer.exe,3
[Taskbar]
Command=ToggleDesktop
When you save the file, select All Files from the drop down menu, and name the icon Desktop.scf
How to really pin the Show Desktop to Taskbar in Windows 7

Whether you download or create the desktop file yourself, make sure to save it into this directory:
quote:3) Right click the item you pinned earlier (in my case, TweetDeck) and click on Properties.C:\Users\%USERNAME%\AppData\Roaming\Microsoft\Internet Explorer\Quick Launch\User Pinned\TaskBar
4) Edit the Target Field to the following. Change the field yourusername to your Computer name. You can find this by opening the Start Menu and looking at the first item in the darkened area.

quote:Paste this code into the Target Field. Make sure to change yourusername.
C:\Users\yourusername\AppData\Roaming\Microsoft\Internet Explorer\Quick Launch\User Pinned\TaskBar\Desktop.scf

5) Now we need to change the icon. Click on Change Icon and paste the following code into the Browse field and press Enter:
quote:The Show Desktop icon is located somewhere near the middle. This was where mine was located:%SystemRoot%\system32\imageres.dll

6) You can also rename your icon to Show Desktop so you don’t get confused when editing the taskbar later on.
7) Your icon in the Taskbar will not change unless you log off and log back in or end the explorer.exe process in Task Manager. Regardless, the icon should function like the old “Show Desktop” icon.
If you’re a fan of keyboard shortcuts, Win+D shows the desktop too.
Windows 7 now has the ability to “uninstall” Internet Explorer 8. This decision was most likely made due to the antitrust issues Microsoft has been facing with the European Union, who has been pressuring Microsoft to either provide alternative browsers or not offer IE at all. Interestingly, European copies of Windows do not come with any built-in Media Players.
Anyway, “uninstall” means you can now remove the Internet Explorer executable completely from Windows 7. The IE files themselves will not be removed (for now) because IE has been integrated into a couple Windows components. If you really want to get rid of the IE executable, this is how.
1) Open the Start Menu and type in Windows Features

2) Uncheck the Internet Explorer box

Once you click OK, you will be prompted to restart. After the restart, Windows will make a few configurations and reboot again. After that, you’re all set.
WinVistaClub updated their Ultimate Windows Tweaker. It can edit over a hundred settings, which can customize your desktop fully to your liking.
http://www.winvistaclub.com/

As you can see from the picture, there are quite a few options for you to choose from.� Ultimate Windows Tweaker detects what your operating system is and what browser you are using and offers you only the relevant tweaks, so it is very safe to use. It also lets you create sytem restore points before you make tweaks so you can restore your system if anything does happen.
This is a very small application, only 380 KB and does not require any installation process. It was originally designed for Windows Vista, but has been made to tweak some of Windows 7 settings too. You can download Windows Ultimate Tweaker 1.1 here.
http://www.winvistaclub.com/Ultimate_Windows_Tweaker.html
Many other tweaking programs will probably surface and there are a few already (if you search around enough, you might find some); when they do, we’ll let you know.
die tip is dus meer taskbar vervuiling
Voor de rest wel nuttige tips
Ik zit er over te denken om via surfspot de ultimate versie te kopen.
One new feature of the taskbar in Windows 7 is thumbnail previews of multiple windows of a specific application. By default, there is a 400ms delay before the thumbnails appear. This can be easily changed. First, download the registry key I have provided below.
Download Change Hover time Registry Key here
http://windows7center.com(...)hange_hover_time.reg
By default, the registry key file is set to decrease the delay to 30ms. If you want to change this, you can right click the registry key, and click on Edit. In Notepad, you can change the number 30 to anything between 0 and 4000. I don’t recommend choosing 0 for the delay. Once you’re done, save the file and double-click it to add the key to the registry. Changes don’t take effect until you restart your computer.

Manual Method:
You can also edit the registry key manually yourself.
1) Open the Start menu and type regedit in the search bar
2) Proceed to the following directory: HKEY_Current_USER\Control Panel\Mouse
3) Right click the MouseHoverTime key and choose Modify
4) Change it to a value between 0 and 4000. The number you input will be the millisecond delay before thumbnail previews activate when you hover your mouse over an application.I don’t recommend selecting a value of 0 for this option.
Changes don’t take place until you restart your computer.
If you want the full Windows 7 experience the Aero glass interface is a must. Without the slick glass interface a number of key features will be disabled such as taskbar thumbnails and Aero Peek. According to Microsoft the bare minimum requirements for Aero is a graphics card that supports DirectX 9.0 or newer and a native WDDM (Windows Display Driver Model) driver. In most cases when you install Windows 7 Aero will be enabled but on some configurations various issues prevent the feature from starting.
The most common issue I have seen is a lack of compatible WDDM drivers. When Windows 7 was installed compatible drivers were not found on the installation media. In this scenario Windows will search on Windows Update for compatible drivers once an internet connection is established. To make Windows search for new drivers manually just click on the Start Button and type in Windows Update. Then, click Check for updates.
If no WDDM compatible drivers are found for your video adapter on Windows update try looking on the manufacturers Web site.
After you have, or your system has automatically updated your video adpater drivers to compatible WDDM drivers it is best to refresh the Windows Experience Index. This will run the Windows Experience performance tool to benchmark your computer and identify what features should be turned on and off. Click on the Start Button and type in check the windows experience index and hit Enter. Next, click Refresh Now.
If you still have problems try running the Aero Troubleshooting utility by clicking on the Start Button and typing in Find an fix problems with transparency and then hit Enter.
As a last resort you can try the old Windows Vista registry hack to enable Aero glass on low end systems.
http://tweaks.com/article(...)compatible-hardware/
Fine Tune Visual Settings
The Windows 7 eye candy is the main cause of GUI slowness. While my netbook has a decent graphics card that can display Aero Glass it can be choppy at times. Follow these steps to improve the performance of the interface:
Click on the Start Button and type in adjust the appearance and hit Enter. This will load the Visual Effects performance options.

On this screen I suggest disabling the following settings by removing the check:
* Animate controls and elements inside windows
* Animate windows when minimizing and maximizing
* Enable transparent glass
* Fade or slide menus into view
* Fade or slide ToolTips into view
* Fade out menu items after clicking
* Show shadows under windows (this may be worth the performance hit for some)
* show thumbnails instead of icons
* show translucent selection rectangle
* Show window contents while dragging
* Slide open combo boxes
Click OK when you are finished.
Remove Startup Programs
Nothing wastes resources more is startup programs that you don’t need. Click on the Start Button and type in msconfig and hit Enter.
When the System Configuration utility is loaded click on the Startup tab.

Remove the check next to any applications you don’t need and click OK.
Disable Services
Now it’s time to trim the Windows services running in the background of your computer.
Click on the Start Button and type in services.msc and hit Enter.

When the Services management console is shown you can stop and disable services by selecting the service, right clicking and selecting Properties. Then change the Startup type to Disabled and hit the Stop button. Finally click OK to return to the Services management console.
I recommend disabling the following services on a netbook:
* Block Level Backup Engine Service
* Bonjour Service (from iTunes)
* Certificate Propagation
* Group Policy Client (if not on domain)
* HomeGroup Listener
* HomeGroup Provider
* Offline Files
* Portable Device Enumerator Service
* Security Center*
* Software Protection (make sure you activate Windows first)
* SSDP Discovery
* Windows Defender*
* Windows Media Player Network Sharing Service
* Windows Search
Keep in mind that if you use any of these services or applications that depend on them they will no longer function. E.g. if you are a homegroup user don’t disable the Homegroup Provider.
* Make sure you use other security software if you disable these services.
Install More RAM
There is really no good substitute to having plenty of ram in a computer. You can use ReadyBoost but with memory prices so cheap why not just buy more. I purchased a 2GB chip for my netbook for $16 (hopefully the mail-in rebate will come through).
The popular Intel Atom processor netbooks use the Mobile Intel 945GSE Express Chipset that has a max of 2GB of ram supported. The amount of expansion slots or if your netbook even has one depends on the vendor and model of your netbook.
I suggest picking up a 2GB stick of PC2-5300 DDR2 at 667 Mhz on a 200 pin SO-DIMM. That is the type of memory required for the Mobile Intel 945GSE Express Chipset.
quote:Op dinsdag 3 november 2009 09:44 schreef mime_negert het volgende:
Mooi topic!
Ik zit er over te denken om via surfspot de ultimate versie te kopen.
quote:Daar is dit topic voor
Ik heb met meerdere beta versies problemen gehad op mijn pc (traagheid, vastlopers) terwijl er met mijn hardware niets mis is denk ik, aangezien er onder XP 0,0 problemen zijn. Dat maakt mij een beetje huiverig om W7 echt aan te schaffen...
Windows 7 #13
quote:Veel mensen willen hem links hebben en niet rechts en zo smal. Vervuiling? Ik dacht het niet. Het is gewoon aan te passen aan je wensen zo heb je voor beide iets.
Die show desktop knop is wel compleet overbodig.. die Aero Peek button laat inderdaad alleen de desktop zien als je er op gaat staan, maar als je OP die Aero Peek button KLIKT ga je wel helemaal naar je desktop.. en nog mooier, als je nog eens op die Aero Peek button klikt krijg je weer alle windows te zien als voorheen,
die tip is dus meer taskbar vervuiling
Voor de rest wel nuttige tips
Opgelost, slotje
Folders kun je ook naar de taskbar pinnen. Deze komen dan in het rechtermuisknop menu van Explorer in de taskbar te staan.
is dat showdesk top rechts ook compleet weg te modden

Alvast bedankt
quote:Nee (nog niet)
vraagje
is dat showdesk top rechts ook compleet weg te modden
[ link | afbeelding ]
Alvast bedankt
Je kan wel de Aero peek uitschakelen.
If you want to disable "Aero Peek" feature so that it doesn't hide open windows when you hover the mouse cursor over it, then you can do it by disabling "Use Desktop Preview" option in Taskbar Properties:
Volgens mij is het ook makkelijker om zulke vragen in het windows 7 topic te houden.
Windows 7 #13
Dan houden we dit topic als naslag werk met uitgewerkte tips en tricks.
nu kwam ik al wel een VB'tje tegen waarmee het zou kunnen, maar het is het toch nog niet helemaal....iemand al iets knaps hiervoor gevonden??
quote:ok sorry verkeerd topic dus
[..]
Nee (nog niet)
Je kan wel de Aero peek uitschakelen.
If you want to disable "Aero Peek" feature so that it doesn't hide open windows when you hover the mouse cursor over it, then you can do it by disabling "Use Desktop Preview" option in Taskbar Properties:
Volgens mij is het ook makkelijker om zulke vragen in het windows 7 topic te houden.
Windows 7 #13
Dan houden we dit topic als naslag werk met uitgewerkte tips en tricks.
quote:Ik snap dit niet. Echt niet. Het nieuwe Start menu is een enorme vooruitgang. Sterker nog, er is geen manier waarop het oude Start menu kan opwegen tegen het nieuwe Start menu.
ik wil mn oude start-menu terug
nu kwam ik al wel een VB'tje tegen waarmee het zou kunnen, maar het is het toch nog niet helemaal....iemand al iets knaps hiervoor gevonden??
quote:Wel als je veel met het toetsenbord doet ipv de muis.... vroeger was het gewoon windowsvlaggetje>>p>>en dan de letter die je moest hebben.... om nog maar te zwijgen van gemakkelijke items als even snel bij je netwerkkaarten komen e.d. Dat kost in W7 zo verschrikkelijk veel meer handelingen...
[..]
Ik snap dit niet. Echt niet. Het nieuwe Start menu is een enorme vooruitgang. Sterker nog, er is geen manier waarop het oude Start menu kan opwegen tegen het nieuwe Start menu.
quote:Ik snap het ook nietOp dinsdag 3 november 2009 13:06 schreef elfzesendertig het volgende:
[..]
Ik snap dit niet. Echt niet. Het nieuwe Start menu is een enorme vooruitgang. Sterker nog, er is geen manier waarop het oude Start menu kan opwegen tegen het nieuwe Start menu.
Van die mensen die dan switchen naar een nieuw OS, maar dan alles gaan zitten tweaken zodat het precies op een oudere versie lijkt
quote:Die discussie is al vaker gevoerd in het windows 7 topic en dat lijkt mij in dit geval ook de juiste plek.
[..]
Ik snap dit niet. Echt niet. Het nieuwe Start menu is een enorme vooruitgang. Sterker nog, er is geen manier waarop het oude Start menu kan opwegen tegen het nieuwe Start menu.
quote:'t hoeft van mij niet op de oude versie te lijken hoor, maar 't moet wel gebruiksvriendelijk zijn
[..]
Ik snap het ook niet
Van die mensen die dan switchen naar een nieuw OS, maar dan alles gaan zitten tweaken zodat het precies op een oudere versie lijkt
Net zoals de werkbalken in Office 2007 zo'n "vooruitgang" zouden moeten zijn, maar alles wat je in office blindelings kon vinden mag je overboord gooien en weer helemaal opnieuw beginnen met office te leren kennen..... zit ik niet echt op te wachten als ik eerlijk ben
Maar goed, er zijn dus al wel een paar tooltjes die e.e.a al verbeteren (zoals deze: http://www.howtogeek.com/(...)t-menu-in-windows-7/ ) maar het is het toch nog net niet helemaal; het voelt erg "thuis-knutselaars" aan en geeft niet echt de goede feeling van het menu (beetje lastig uit te leggen, maar hopelijk begrijp je wat ik bedoel
quote:Da's wel waar ja... de vraag was dus of het uberhaubt al mogelijk is; hetzij door een update van Microsoft (maar dat verwacht ik niet) hetzij door een tool van een externe partij
[..]
Die discussie is al vaker gevoerd in het windows 7 topic en dat lijkt mij in dit geval ook de juiste plek.
quote:Wat is er zo slecht aan het nieuwe Start menu dan?
[..]
't hoeft van mij niet op de oude versie te lijken hoor, maar 't moet wel gebruiksvriendelijk zijnzo is de nieuwe explorer een grote vooruitgang (met name dat de linker helft van je scherm blijft staan terwijl je rechts door mappen heen klikt is een groot pluspunt) maar het start-menu is om te janken. In XP was het by default al niet mn favoriet, maar daar kon ik nog enigszins mee leven (alhoewel ik het ding wel altijd meteen terug knalde naar klassiek) en in Vista was het er absoluut niet beter op geworden (dus ook weer naar klassiek). In 7 is het niet meer mogelijk om terug te gaan en dat irriteert me mateloos.
Net zoals de werkbalken in Office 2007 zo'n "vooruitgang" zouden moeten zijn, maar alles wat je in office blindelings kon vinden mag je overboord gooien en weer helemaal opnieuw beginnen met office te leren kennen..... zit ik niet echt op te wachten als ik eerlijk ben
Maar goed, er zijn dus al wel een paar tooltjes die e.e.a al verbeteren (zoals deze: http://www.howtogeek.com/(...)t-menu-in-windows-7/ ) maar het is het toch nog net niet helemaal; het voelt erg "thuis-knutselaars" aan en geeft niet echt de goede feeling van het menu (beetje lastig uit te leggen, maar hopelijk begrijp je wat ik bedoel)
quote:Probeer er eens snel op een toetsenbord doorheen te navigeren en je vraag is meteen beantwoord (maar goed, dat gaf ik daarboven al aan). Daarnaast kun je niet meer zo even snel bij je settings van je netwerk komen zonder dat je veel meer handelingen moet doen dan voorheen.
[..]
Wat is er zo slecht aan het nieuwe Start menu dan?
quote:Volgens mij heb ik daar ook al eens antwoord op gegeven in het windows 7 topic en als het mogelijk was dan had ik hem ook zeker toegevoegd. Het is momenteel niet mogelijk.
[..]
Da's wel waar ja... de vraag was dus of het uberhaubt al mogelijk is; hetzij door een update van Microsoft (maar dat verwacht ik niet) hetzij door een tool van een externe partij
quote:Windows 7 #13
Zal mn 64bit computer beter lopen met 7 dan met vista 64bit?
quote:Waarom zou je zo'n omslachtige manier gebruiken? Heb je al eens geprobeerd te typen wat je zoekt?
[..]
Probeer er eens snel op een toetsenbord doorheen te navigeren en je vraag is meteen beantwoord (maar goed, dat gaf ik daarboven al aan). Daarnaast kun je niet meer zo even snel bij je settings van je netwerk komen zonder dat je veel meer handelingen moet doen dan voorheen.
Wil je Internet Explorer opstarten? Typ dan gewoon "inter" en hup daar staat hij al. Nu alleen nog op Enter drukken. Of typ "word" en druk op Enter en tsjakka, Word start op.
Zodra je het menu geopend hebt kan je direct beginnen met typen.
quote:was die topic zoeken en linken nou sneller dan een ja of nee?
quote:Dat bedoel ik dus.... dat zijn een hele hoop meer handelingen. Windows-vlaggetje>>p>>i zijn maar 3 knoppen t.o.v windowsvlaggetje>>inter wat er 6 zijn. Daarnaast werkt dat natuurlijk alleen als je de exacte naam van je shortcut weet, en niet als je een programma zoekt.
[..]
Waarom zou je zo'n omslachtige manier gebruiken? Heb je al eens geprobeerd te typen wat je zoekt?
Wil je Internet Explorer opstarten? Typ dan gewoon "inter" en hup daar staat hij al. Nu alleen nog op Enter drukken. Of typ "word" en druk op Enter en tsjakka, Word start op.
Zodra je het menu geopend hebt kan je direct beginnen met typen.
Het is natuurlijk een persoonlijke voorkeur voor wat je plezierig vindt werken, maar voor mij is het klassieke start-menu gewoon veel prettiger dan dat nieuwe ding. In vista was het ten minste nog een keuze, en nu wordt het je opgedrongen
quote:Ik kan begrijpen dat 3 knoppen minder is dan 6 knoppen. Ik gaf echter maar een voorbeeldje. Zelfs door alleen "i" te typen verschijnt Internet Explorer al. Het voordeel van de zoekmethode is dat je niet de exacte toetscombinatie hoeft te weten. Als je een programma zoekt, dan weet je toch waar je naar zoekt? Dan typ je dat of een deel daarvan dus in. Klaar ben je
[..]
Dat bedoel ik dus.... dat zijn een hele hoop meer handelingen. Windows-vlaggetje>>p>>i zijn maar 3 knoppen t.o.v windowsvlaggetje>>inter wat er 6 zijn. Daarnaast werkt dat natuurlijk alleen als je de exacte naam van je shortcut weet, en niet als je een programma zoekt.
Het is natuurlijk een persoonlijke voorkeur voor wat je plezierig vindt werken, maar voor mij is het klassieke start-menu gewoon veel prettiger dan dat nieuwe ding. In vista was het ten minste nog een keuze, en nu wordt het je opgedrongen
Bovendien stelt het nieuwe Start menu je ook in staat om je bestanden e.d. te doorzoeken. Als ik bijvoorbeeld "kings" typ, dan kan ik vanuit het Start menu Kings of Leon gaan beluisteren.
quote:Voor die vragen is dit topic niet bedoeld. Daar is al een topic voor.
[..]
was die topic zoeken en linken nou sneller dan een ja of nee?
Dit topic is bedoeld voor uitgewerkte tips&tweaks.
quote:Het punt is dat je niet altijd de exacte benaming weet na installatie, of dat je op een pc van een ander zit en even rustig wilt kunnen zien wat erop zit. Da's niet zo heel praktisch.
[..]
Ik kan begrijpen dat 3 knoppen minder is dan 6 knoppen. Ik gaf echter maar een voorbeeldje. Zelfs door alleen "i" te typen verschijnt Internet Explorer al. Het voordeel van de zoekmethode is dat je niet de exacte toetscombinatie hoeft te weten. Als je een programma zoekt, dan weet je toch waar je naar zoekt? Dan typ je dat of een deel daarvan dus in. Klaar ben je
quote:Tja, als ik bestanden wil zoeken doe ik wel windows-vlaggetje+E en Ctrl+F; daar heb ik geen start-menu voor nodig.Bovendien stelt het nieuwe Start menu je ook in staat om je bestanden e.d. te doorzoeken. Als ik bijvoorbeeld "kings" typ, dan kan ik vanuit het Start menu Kings of Leon gaan beluisteren.
Maar het belangrijkste punt is nog wel dat het configuratie-gedeelte heel ontoegankelijk gemaakt wordt op deze manier en dat werkt voor mij erg onplezierig (aangezien ik daar zeer regelmatig in moet zijn)
quote:Als je toch al rustig gaat bladeren, dan kan dat ook gewoon in het nieuwe Start menu. Daar ziet niet echt een substantieel verschil in.
[..]
Het punt is dat je niet altijd de exacte benaming weet na installatie, of dat je op een pc van een ander zit en even rustig wilt kunnen zien wat erop zit. Da's niet zo heel praktisch.
quote:Wel degelijk; de lijst die je te zien krijgt is een stuk kleiner dus je scrolt je een ongeluk dan. Maar wat de motivatie ook is doet er eigenlijk helemaal niet toe; ik en met mij een hoop anderen (dat blijkt wel als je erop gaat googlen) ben er niet blij mee en wil gewoon weer het oude startmenu terug. De beschikbare tooltjes die ik tot nu toe gevonden heb zijn het nog net niet helemaal dus ik hoopte dat er al wat beters was
[..]
Als je toch al rustig gaat bladeren, dan kan dat ook gewoon in het nieuwe Start menu. Daar ziet niet echt een substantieel verschil in.
of zelfs een zelf gemaakt filmpje?
quote:Lukt wel als je vinkjes aanzet bij die items.
[..]
Probeer er eens snel op een toetsenbord doorheen te navigeren en je vraag is meteen beantwoord (maar goed, dat gaf ik daarboven al aan). Daarnaast kun je niet meer zo even snel bij je settings van je netwerk komen zonder dat je veel meer handelingen moet doen dan voorheen.
Je kunt namelijk kiezen wat je in dat startmenu wil hebben.
Dus als je netwerkcentrum er standaard er al inzet valt het qua tijd nog wel mee hoor.
quote:Er is een verschil tussen het netwerk-centrum en de netwerk-adapters. Maar goed, da's allemaal ook niet de vraagstelling; ik wil gewoon mn oude start-menu'tje terug. Maar kennelijk kan dat nog niet helemaal zoals het was...
[..]
Lukt wel als je vinkjes aanzet bij die items.
Je kunt namelijk kiezen wat je in dat startmenu wil hebben.
Dus als je netwerkcentrum er standaard er al inzet valt het qua tijd nog wel mee hoor.
Dreamscene was a feature introduced in Windows Vista that allowed users to have video wallpapers in the background. Microsoft seems to have replaced the Dreamscene feature from Vista with automatic changing wallpapers in Windows 7. However by adding the Dreamscene files and making a few registry changes, Dreamscene can once again be enabled. Don’t worry if that sounded intimidating, we do have a file that does all for you [if you're on 32-bit.]
Note: I was unsuccessful in getting this to work on 64-bit Windows 7 Build 7048.
Installing Dreamscene:
1) First, you need to have Aero enabled. You’ll know Aero is enabled if you’re able to preview windows in your taskbar, use Aero Peek, or see the animation effects of windows minimizing. If you think Aero isn’t enabled, open the Start menu, and type in Aero.

Click on Find and fix problems with transparency and other visual effects and go through the wizard. The wizard will determine whether your computer is capable of having Aero on.
2) If you’re on 32-bit Windows 7, download the Windows 7 Dreamscene patch here
http://windows7center.com(...)reamScene-Enable.exe
If you’re on 64-bit Windows 7, download this patch and follow the instructions in Important Readme.txt
Then skip Step 3.
http://windows7center.com/wp-content/downloads/dreamscene64.rar
3) Run the patch and let it do it’s thing. When it’s finished, explorer.exe will restart.
If it doesn’t restart, press Ctrl + Alt + Delete and click on Task Manager. Right click on explorer.exe and click on End Task. Then click on File, New Task, type in explorer.exe and press OK.
Setting video clips as your desktop background
4) Before you start adding videos, you need to make sure that your videos are in .wmv or .mpg format. If they are not one of those formats, you can download a free video converter here.
http://www.any-video-converter.com/download-avc-free.php
Converting a video is simple. Choose Add Video at the top left corner and choose your video of choice. The drop down-menu in the right side-bar will allow you to choose your codec. On my computer, .wmv videos worked properly while .mpg videos would not work with Dreamscene.
The bottom portion of the sidebar will allow you to change the video size or bitrate. If you are not sure what those options do, the only one you should worry about is video size since some videos may end up being too large and get cut off the screen.

When the video is finished converting, a new window will pop up. Right click your video and choose Open Destination File Location to locate the video. You can also access your converted videos at this directory:
C:\users\%username%\Documents\Any Video Converter\

Once you have converted the file, just right-click and select Set as Desktop Background and Dreamscene will begin to work.
Should you want to revert back to a stationery wallpaper, sometimes the stopped video will stay frozen as your wallpaper. To fix this, press Ctrl + Alt + Delete and click on Task Manager. Right click on explorer.exe and click on End Task. Then click on File, New Task, type in explorer.exe and press OK.
Note: Desktop icon text will become transparent sometimes. This is a bug that has yet to be fixed.
quote:Toegevoegd dus
is het in windows 7 ook mogelijk om net als in vista van die bewegende achtergronden te gebruiken?
of zelfs een zelf gemaakt filmpje?
Tips & Tricks voor Windows 7
quote:als je dan toch een toetsenbordgek bent, weet je best dat je daar het best kan komen door ncpa.cpl te gebruikenOp dinsdag 3 november 2009 16:08 schreef kroegtijger het volgende:
[..]
Er is een verschil tussen het netwerk-centrum en de netwerk-adapters. Maar goed, da's allemaal ook niet de vraagstelling; ik wil gewoon mn oude start-menu'tje terug. Maar kennelijk kan dat nog niet helemaal zoals het was...
quote:Ook dat is mij inderdaad bekend, maar dan moet ik dus mn desktop gaan behangen met shortcuts naar cpl-files, terwijl het in de voorgaande windows-versies naar mijn mening prima was geregeld... Dus het startmenu is wat mij betreft gewoon een achteruitgang.
[..]
als je dan toch een toetsenbordgek bent, weet je best dat je daar het best kan komen door ncpa.cpl te gebruiken
Ik ben niet op zoek naar workarounds; die kan ik zelf ook wel verzinnen... ik ben op zoek naar mn oude start-menu
http://www.howtogeek.com/(...)t-menu-in-windows-7/
quote:beetje jammer dat je dezelfde link geeft die ik zelf ook al gepost had, maar die komt op zich nog wel aardig in de buurt ja. Heb m dr al even in gegooid, maar het is 't om een of andere reden nog net niet helemaal. Don't ask why, want alles lijkt wel zoals het hoort, maar de feeling erbij klopt net niet.... of 't nou het lettertype is, of de net effe te brede menu-structuur of iets dergelijks weet ik niet, maar for the time being gebruik ik deze. Hopelijk dat een andere ontwikkelaar zich er nog eens op stort, of dat microsoft toch nog over stag gaat en alsnog het oude menu erin prakt...
Menu clasic
http://www.howtogeek.com/(...)t-menu-in-windows-7/
En ik wil internet explorer ook graag zoals eerst...
En ik kan vanuit acdsee geen plaatjes meer slepen naar mijn fotoprogramma ik moet ze eerst kopieren en dan plakken, vind dat dus reteirritant allemaal...
Moevanist
The inability to minimize MSN Messenger into the system tray in Windows 7 is a nuisance for a many users. By running MSN in compatibility mode and selecting Windows Vista, MSN will no longer remain in the taskbar and will minimize into the system tray instead.
How-to:
1) Go to your MSN folder. It’s usually located at: C:\Program Files\Windows Live\Messenger
2) Right click msnmsgr.exe and select Properties

3) Select the Compatibility tab at the top.
4) Check Run this program in compatibility mode for: and select Windows Vista from the drop-down menu

5) Click Apply, then OK, and you’re finished
You’ll need to completely close MSN Messenger and re-open it for changes to take place.
quote:MSN toegevoegd. IE is geen duidelijk omschrijving van je en acdsee is geen windows probleem zo te horen.
Ik wil dat msn uit die onderbalk en liefst gewoon zijkant zoals eerst.
quote:Heey supers van je! Het is gelukt!~Op woensdag 4 november 2009 07:40 schreef Godtje het volgende:
How to minimize MSN Messenger to the system tray in Windows 7
The inability to minimize MSN Messenger into the system tray in Windows 7 is a nuisance for a many users. By running MSN in compatibility mode and selecting Windows Vista, MSN will no longer remain in the taskbar and will minimize into the system tray instead.
[ afbeelding ]
How-to:
1) Go to your MSN folder. It’s usually located at: C:\Program Files\Windows Live\Messenger
2) Right click msnmsgr.exe and select Properties
[ afbeelding ]
3) Select the Compatibility tab at the top.
4) Check Run this program in compatibility mode for: and select Windows Vista from the drop-down menu
[ afbeelding ]
5) Click Apply, then OK, and you’re finished
You’ll need to completely close MSN Messenger and re-open it for changes to take place.
WOW!

[ Bericht 6% gewijzigd door editoor op 04-11-2009 15:57:27 ]
After getting windows 7 I noticed that my downloads of the Linux kernel through utorrent were running at incredibly slow speeds.
Though the reasons behind this may be complicated, the solution turned out to be rather simple.
The first solution is direct, and very simple. You need to disable UPnP port mapping in the settings of utorrent, and run it in compatibility mode for Windows XP SP2. For the uninitiated: right click properties of utorrent shortcut, head to compatibility, and make it look like the picture.
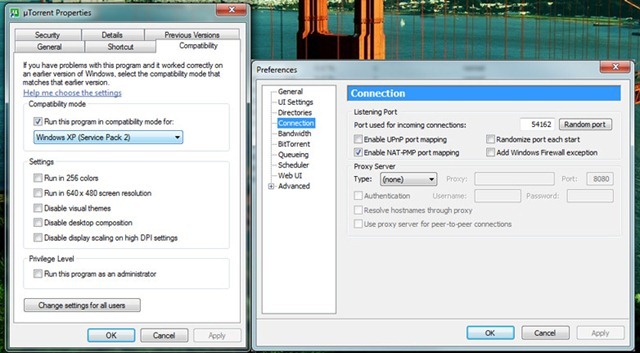
Now the second, optional, part will require patching of your tcpip.sys. As you may, or may not, be aware Microsoft introduced a half-open connection limit in XP SP2, and included it in Vista and Win7. As far as the official reason, it was done to hinder the speed at which certain trojans and viruses spread. The real result: slower torrent speeds.
This is very simple. Head over to http://half-open.com/home_en.htm and grab the Half-open limit fix 4.0. Patch it to whatever you need, and restart.

quote:Ja, heel veel talent voor ctrl c + ctrl v
quote:Het is een mooie centrale plek voor alle tips en tricks zo. In het 'gewone' win7 topic komt ook een hoop voorbij, maar is het moeilijk terug te vinden. Op deze manier niet. En liever copy-past dan slechte vertalingen etc.Op vrijdag 6 november 2009 09:38 schreef Loveless85 het volgende:
[..]
Ja, heel veel talent voor ctrl c + ctrl v
Language packs or MUI packs are used to change the default language of Windows 7 to a language of your choice. For example, download and installing the French language pack will translate all the menus and options in Windows 7 into French.
This feature is only available in Windows 7 Enterprise and Ultimate. You can download these language packs via Windows Update. Google works as well. The hard part is installing them, which is outlined in the walkthrough below:
Installing the Language Pack:
Start off by accessing the Control Panel through the Start Menu
Then select Change Display Challenge under the Clock, Language, and Region Box. If you’re in Classic View, select Regional and Language Options.

Make sure you’re on the “Keyboards and Languages” tab and click on Install/Uninstall Languages

Select the 2nd option and Browse to your DVD drive or where you had previously extracted the ISO. You only need to navigate to the directory in which the language pack is in. For some reason, the ISO doesn’t show up as a selectable option. (Microsoft may offer these language packs as optional updates in the near future.)

Click Open and Windows will automatically find the language pack. Accept the EULA and Install the Language Pack. This can take quite a while. Once you’re done, you’ll be asked if you want to switch to the installed language pack. Whenever you switch language packs, you will have to log off and log back in for the changes to take into effect. In the future when you want to change language packs that have already been installed, head back to the “Keyboards and Languages” tab under Regional and Language Options and you should be able to select from a menu of different language packs. Just want to note that Windows 7 Beta actually switched to my new language pack without me having to log off even though it had asked me to.

[ Bericht 91% gewijzigd door #ANONIEM op 14-11-2009 23:57:19 ]
A simple and effective way to remove the watermark is to download the Watermark Removal Script which automates the entire process for you.
The previous watermark remover had some problems on x64 systems, I have updated the post with the remover by deepxw which works perfectly on 64bit systems too.
You can download this Windows 7 (7100 - RC) Desktop Watermark Remover
Save it to your desktop, unzip, choose either the 32 or 64bit version depending on which you installed then right click and select run as administrator.
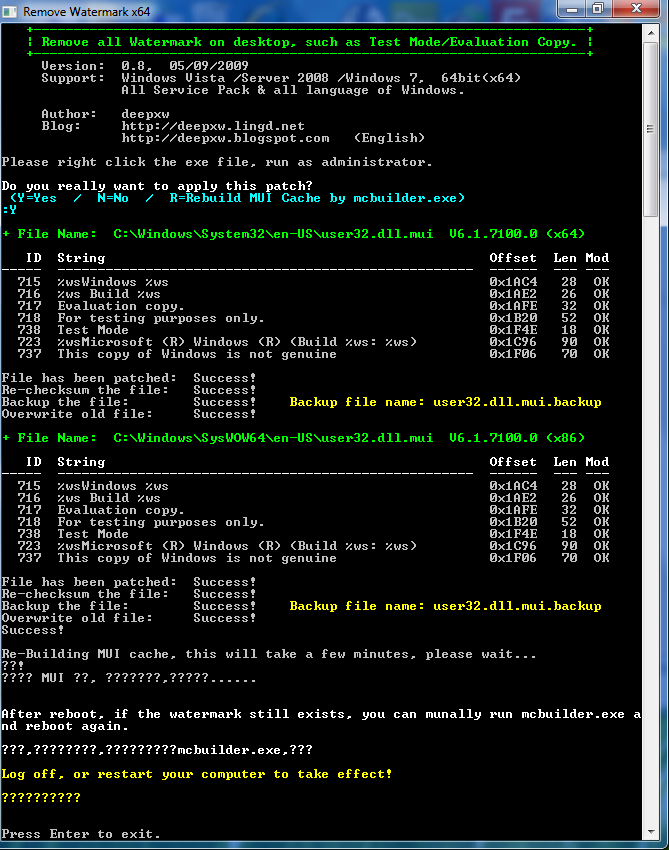
The script will then go through the process of removing the watermark, the entire process will take a minute or two. After its finished re start your computer and the watermark will be gone.
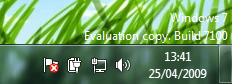
Before:
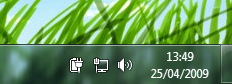
After:
Dit zijn vaak executables.
Deze kan je als compatibility mode uitvoeren op XP-SP2
Voor mij werkte het, zowel de onboard netwerk als de onboard video adapter heb ik aan de praat gekregen hiermee
Bron
quote:Ik heb mijn oude NVTV Tv-kaart, die speciaal voor XP-MCE ontwikkeld is, op deze manier aan de praat gekregen. Ik had wel de indruk dat het apparaat iets minder snel reageerde.Op woensdag 2 december 2009 22:32 schreef marcel-o het volgende:
Ik weet niet of het al genoemd is maar als je geen drivers kan vinden(windows 7 starter) voor een wat oudere pc/notebook kan je hiervoor de XP drivers gebruiken van de website van de fabrikant.
Dit zijn vaak executables.
Deze kan je als compatibility mode uitvoeren op XP-SP2
Voor mij werkte het, zowel de onboard netwerk als de onboard video adapter heb ik aan de praat gekregen hiermee
Bron
Vraag me toch af wat de logica daar achter is
ik ga eens knoeien met de services
Maar dat van die driver vond ik wel vet
gewoon uit 2003/2004 ofzo
[ Bericht 20% gewijzigd door marcel-o op 03-12-2009 00:20:45 ]
quote:De atom processor is misschien gewoon sneller .. ?Op woensdag 2 december 2009 23:24 schreef marcel-o het volgende:
ik heb starter op een EEE gezien van Acer(met Atom) daar loopt ie een stuk soepeler op dan deze P4 2.3Ghz
Vraag me toch af wat de logica daar achter is(hyperthreading??)
ik ga eens knoeien met de services
Maar dat van die driver vond ik wel vet
quote:die is 1.6Ghz
[..]
De atom processor is misschien gewoon sneller .. ?
quote:Ik draai W7 ultimate, ietwat gestript op een Asus T91 EEEnetbook en dat draait vlot, ik moet er alleen nog 2Gb ipv 1Gb insteken omdat mn werkgeheugen nu de hele tijd voor 2/3 vol zitOp donderdag 3 december 2009 00:21 schreef marcel-o het volgende:
die is 1.6Ghz
quote:Ik vind het ook niks, maar doe eens voor de grap:Op dinsdag 3 november 2009 13:41 schreef kroegtijger het volgende:
[..]
Dat bedoel ik dus.... dat zijn een hele hoop meer handelingen. Windows-vlaggetje>>p>>i zijn maar 3 knoppen t.o.v windowsvlaggetje>>inter wat er 6 zijn. Daarnaast werkt dat natuurlijk alleen als je de exacte naam van je shortcut weet, en niet als je een programma zoekt.
Het is natuurlijk een persoonlijke voorkeur voor wat je plezierig vindt werken, maar voor mij is het klassieke start-menu gewoon veel prettiger dan dat nieuwe ding. In vista was het ten minste nog een keuze, en nu wordt het je opgedrongen
Windows toets, i, enter
Ik heb altijd tonnen programma's ge�nstalleerd en normaal kon ik er makkelijk doorheen, nu moet ik veeeeeel scrollen. Ook mis ik de RUN optie, al kan dat natuurlijk met windows toets + R.
Ook resolutie veranderen was rechtermuis op desktop > properties, nu is het personalize en moet je nog meer dingen door. Ook werkt nog niet alles even goed, nvidia driver die steeds crasht etc.
Windows is wel stabiel, dat is wel lekker, ik denk een jaartje en we zijn net zo tevreden als met XP.
quote:zou deze in t nederlands kunnen aub?? ik kom er niet uitOp dinsdag 3 november 2009 09:34 schreef Godtje het volgende:
How to really pin the Show Desktop to Taskbar in Windows 7
you’ve just picked up Windows 7, you’re probably wondering where the Show Desktop button has gone. It’s actually now moved to the bottom right hand corner of the screen for quick access. Hovering your mouse over it will activate Aero Peek and allow you to preview the Desktop without actually going to it. This feature is good for taking a quick peek at any Gadgets you may have lying on your desktop.
But if you still want a “Show Desktop” icon in your taskbar, it’s possible. This guide will teach you how to pin Show Desktop properly into the taskbar, not the method that gives you a strange unaligned placement in the taskbar.
[ afbeelding ]
vs
[ afbeelding ]
he guide is actually not as long as it looks. I added a lot of pictures to guide you along the process.
How-to:
1) First, you need to pin an item you don’t actually want in the taskbar. I chose TweetDeck because it stays in the System Tray anyway.
[ afbeelding ]
2) Then you need to create your own Show Desktop icon. You can download the Icon here, or do it yourself.
http://windows7center.com/wp-content/desktop.rar
To do it yourself, open Notepad and paste the following code:
[..]
[ afbeelding ]
Whether you download or create the desktop file yourself, make sure to save it into this directory:
[..]
3) Right click the item you pinned earlier (in my case, TweetDeck) and click on Properties.
4) Edit the Target Field to the following. Change the field yourusername to your Computer name. You can find this by opening the Start Menu and looking at the first item in the darkened area.
[ afbeelding ]
[..]
[ afbeelding ]
5) Now we need to change the icon. Click on Change Icon and paste the following code into the Browse field and press Enter:
[..]
The Show Desktop icon is located somewhere near the middle. This was where mine was located:
[ afbeelding ]
6) You can also rename your icon to Show Desktop so you don’t get confused when editing the taskbar later on.
7) Your icon in the Taskbar will not change unless you log off and log back in or end the explorer.exe process in Task Manager. Regardless, the icon should function like the old “Show Desktop” icon.
If you’re a fan of keyboard shortcuts, Win+D shows the desktop too.
1) Realtek HD Audio drivers werden niet door Windows zelf herkend, hier werd een standaard driver voor gekozen. Gevolg: kan niet vanuit de geluidskaart zelf opnemen.
Nivia (moederbord) driver werd ook niet geaccepteerd. Realtek biedt op hun site zelf geen drivers aan.
ik hoorde toen van nog 2 vrienden dat ze hetzelfde probleem hadden.
Na een lange zoektocht hier een link naar de Realtek HD drivers die perfect werken
http://mirror4.driverrobo(...)/Audio_VT_090513.zip
2) opnemen van (Realtek) geluidskaart ("wat men hoort") is standaard niet mogelijk. Dit was onder Vista ook al zo, maar met deze truc is het op te lossen:
- zorg voor de goede drivers (zie hierboven)
- ga naar het configuratiescherm >> hardware & geluiden >> geluid >> audio-apparaten beheren.
- kies het tabblad Opnemen.
- klik met de rechtermuis op het witte vlak en kies: uitgeschakelde/verborgen apparaten weergeven.
- Stereo-Mix (of: 'wat men hoort') verschijnt er nu bij, klik er met rechts op, en kies: inschakelen.
- stel deze nu ook als standaard in, en zorg dat het volume daarvan niet meer op 0 staat (ook niet op 100%, dan gaat het kraken).
3) de Program Files (x86) map is standaard beveiligd, en kun je geen bestanden in wijzigen.
toen ik na Windows installatie Bsplayer had gedownload, wilde ie maar geen nieuwe voorkeursinstellingen opslaan ( ik had bijv. andere skin). Wat bleek toen: het xml-bestand met de instellingen was ook helemaal niet aangepast --> kon niet worden overschreven wegens geen rechten, en deze kon je ook niet zelf aan de map toekennen.
Na deze opdrachtprompt commando's was het opgelost:
takeown /f "C:\Program Files (x86)" /r /d n
icacls "C:\Program Files (x86)" /grant administrators:F /t
4) Mijn firewall bleef steeds meldingen tonen als de PC uit screensaver/slaapstand kwam, of rundll32 bepaalde dll's mocht starten (vreemd genoeg allemaal video-toepassingen).
De logs gaven deze actie aan: rundll32.exe: Create Process, Execute issue
Na wat zoeken vond ik dat Windows Mediaplayer op de achtergrond vanalles doet, ZELFS nadat ik alle Mediaplayer services al op uitgeschakeld had gezet!
dit was de oplossing:
Control Panel -> Administrative Tools (=systeembeheer) -> Computer Management -> Task Scheduler -> Task Schedular Library -> Microsoft -> Windows -> Highlight "Application Experience"
you should have AIT Agent + ProgramDataUpdater at the top.
Right click on ProgramDataUpdater and select Disable.
5) het is technisch gezien niet mogelijk om in Premium de Taskbar Thumbnails uit te schakelen. Dit kon wel in RC1, en kan nog steeds in Ultimate via gpedit.msc.
Maar voor Basic & Premium is deze workaround een optie:
ga via regedit naar:
HKEY_CURRENT_USER\Software\Microsoft\Windows\CurrentVersion\Explorer\Advanced
en maar daar een nieuwe DWORD 32-bits sleutel aan met de naam: ExtendedUIHoverTime
met waarde: 20000.
Met deze 'delay' zie je bijna geen Taskbar popups meer (alleen met MSN Messenger schermen heel soms).
Verwijder oude (verborgen) icoontjes uit de System Tray beheer-lijst (die ruimt windows 7 helaas niet op):
http://emdma.com/remove-p(...)2%80%93-tray-cleaner
Al kun je het ook manueel doen in het register via:
HKEY_CURRENT_USER\Software\Classes\Local Settings\Software\Microsoft\Windows\CurrentVersion\TrayNotify
en dan IconStreams + PastIconsStream verwijderen.


quote:Dit zorgt er voor dat alles in je Control Panel in een lijst komt te staan. Ik vind het wel handig, maar weet niet of het boven de normale CP gaat.Windows 7 interface (and desktop) is rather clean and minimalist. Of course, you can find everything you need in the famous and well-known Control Panel. However this solution won’t allow you to see and easily use all those nested settings included in the main options.
One of the less known options on Windows 7 is the God Mode feature. Basically, it lets you have every setting and option right in front of you, ready to be used without having to browse among different settings before getting what you are looking for. Here is how to enable it:
1. Right click on any bank space on your desktop.
2. Click new from the menu and create a New Folder.
3. Rename the folder as follow: GodMode.{ED7BA470-8E54-465E-825C-99712043E01C}
4. DO NOT use this trick on Vista 64X. It will cause your Windows to crash!
This simple command will create a special shortcut to the God Mode option letting you access all Windows 7 functions via a handy GUI!
quote:Misschien iets met je refresh rate van je beeldscherm? Wat kan ie aan, en wat staat er in windows ingesteld.
Ik heb een probleempje met het beeld in win7. Het knippert namelijk af en toe. Het vreemde is dat hij dat alleen doet als ik gewoon in windows zelf bezig ben. Als ik bijvoorbeeld een spel speel af een film kijk dan heb ik nergens last van. Ik heb windows al een keer opnieuw geinstalleerd en ik heb de nieuwste drivers voor de grafische kaart (Ati HD4870) erop staan. Iemand een idee hoe ik dat op kan lossen?
Rechtermuisknop op het bureaublad -> Schermresolutie -> Geavanceerde instellingen -> tabje beeldscherm.
Misschien dat het hieraan ligt?
Ik maak er even een uitdraai van en dan kan ik met de laptop aan de slag
quote:Held
How to enable the Quick Launch bar in Windows 7
[ afbeelding ]
By default, Windows 7 doesn’t have the Quick Launch bar enabled. But some users may find that they really need the Quick Launch bar back like it was in Vista and XP. Windows 7 doesn’t give you any instant way to bring it back, but it is still possible.
1) Right click any empty area in your taskbar, and uncheck Lock the Taskbar.
[ afbeelding ]
2) Right click any empty area of your taskbar again, select Toolbars, then New Toolbar.
[ afbeelding ]
3) Copy the following address, and paste it into the address bar of Windows Explorer.
[..]
[ afbeelding ]
4) Select the Quick Launch folder, and click on Select Folder below. Do not double-click Quick Launch.
[ afbeelding ]
5) Now you’ll see Quick Launch in your taskbar. Since we previously unlocked the taskbar, you can place the Quick Launch bar anywhere you want by dragging it to the leftmost or rightmost corner of the taskbar.
6) You’ll want to hide the Quick Launch text and program titles as well. Right click the Quick Launch bar and deselect Show Text and Show Title.
[ afbeelding ]
And now you’ve got the Quick Launch bar that was in Vista and XP. Some of you might be happy to know that there is also a Show Desktop and Flip 3D icon.
[ afbeelding ]
Dit was eigenlijk mijn enige irritatie aan het afgelopen weekend ge�nstalleerde Windows 7. Maar vanaf vanavond niet meer
Dat is toch ongeveer hetzelfde?
quote:Omdat je dan moeilijk moet doen als je een tweede/derde/vierde nieuw venster ervan wil openen, en als je het tweede/derde/vierde geopende venster wil weergeven.
Waarom willen mensen de quick launch bar terug als je je veelgebruikte apps ook aan de taakbalk kan pinnen?
Dat is toch ongeveer hetzelfde?
quote:Wat is er moeilijk aan klikken met de rechter muisknop?Op woensdag 6 januari 2010 13:23 schreef Bart het volgende:
[..]
Omdat je dan moeilijk moet doen als je een tweede/derde/vierde nieuw venster ervan wil openen, en als je het tweede/derde/vierde geopende venster wil weergeven.
En het weergeven van geopende vensters doe je door de muiscursor boven het pictogram te zetten, of je zet het combineren uit.
Ik vind het pinnen van apps aan de taakbalk heerlijk om mee te werken.
quote:Niets. Maar het is gewoon nog makkelijker met de werkbalk Snel Starten.
[..]
Wat is er moeilijk aan klikken met de rechter muisknop?
quote:Gefeliciteerd! Ik niet.En het weergeven van geopende vensters doe je door de muiscursor boven het pictogram te zetten, of je zet het combineren uit.
Ik vind het pinnen van apps aan de taakbalk heerlijk om mee te werken.
Echter ratelde de harde schijf als een gek nog voor ik ook maar op play drukte.
wat bleek: rechtsonder in de hoek stond dat WMP alle MP3's, Video's en Foto's van mijn schijf aan het scannen was!
Dit terwijl ik bij de opties juist alles had uitgevinkt dat met de bibiotheek te maken had!
Dit is zeer hinderlijk als je veel muziek of foto's op je schij(f)(ven) hebt.
Nu blijkt dit een bekende bug te zijn van WMP, die ook al in versies 9 en 10 optrad.
Blijkbaar wil MS perse weten wat je allemaal op je hardeschijf aan media hebt.
Hieronder staat hoe je dit kunt uitschakelen:
1) open services.msc via de opdrachtbalk, en schakel deze service uit:
Windows Media Player Network Sharing Service
2) ga via regedit naar:
HKEY_CURRENT_USER\Software\Microsoft\MediaPlayer\Preferences
en pas deze waardes aan:
LibraryHasBeenPopulated = 1
LibraryHasBeenRun = 1
TrackFoldersDirectories = 0
TrackFoldersUseRipDir = 0
en verwijder de mappen die er nog onder staan van muziek, videos, foto's etc.
3) open dan WMP en klik linksboven op: Bestand > Bibliotheken beheren
verwijder daar onder de catagorien muziek, foto's, tv en video de mappen van je harde schijf.
(nb: soms kan WMP vasthangen tijdens het scannen, sluit dan af en doe het opnieuw)
verander hierna naar de Weergave-mode (ctrl+2) en sluit het pogramma af.
Let Op: dit verwijderd tijdelijk ook de Bibliotheken in je Windows Verkenner!
4) voer nu in de opdrachtbalk (of verkenner) in:
%AppData%\Local\Microsoft\Media Player
en verwijder alle *.wmdb bestanden.
nu de belangrijkste stap:
5a)Open nu WMP, en je zou moeten kunnen merken dat hij geen bestanden meer scant.
Er worden echter nu weer twee .wmdb bestanden aangemaakt op de achtergrond.
Sluit WMP af.
5b)Ga weer naar de map: %AppData%\Local\Microsoft\Media Player
Klik met rechts op CurrentDatabase_372.wmdb, kies eigenschappen en stel in: alleen lezen.
doe hetzelfde voor het bestand: wmpfolders.wmdb, maar wis van tevoren de inhoud van dit bestand (via kladblok).
6)Hierna kun je in de Windows verkenner weer je Bibliotheken aanmaken zals voorheen, en kan WMP deze niet meer inlezen doordat de database-bestanden op alleen-lezen zijn gezet.
Vanaf nu kun je WMP eindelijk gebruiken zonder dat je harde schijf eerst een uur ratelt
update:
blijkbaar is schrijftoegang tot het bestand CurrentDatabase_372.wmdb ook nodig als je DVD's wilt afspelen.
maar zodra je alleen-lezen uitvinkt, begint WMP weer te indexeren van je mediabestanden
het is echt een irritante bug!
ik doe nu maar snel op play duwen bij de DVD en dan weer het alleen-lezen aanvinken, maar dit is omslachtig.
ik ga wel weer Anydvd installeren zodat ik geen WMP hoef te gebruiken
[ Bericht 13% gewijzigd door Pwn_zoon op 10-01-2010 17:04:07 (update) ]
quote:Had 't zelfde probleem ook al ondervonden en ook deze oplossing gevonden, maar helaas werkt dat (voor mij in ieder geval) niet prettig. Doordat je media-bibliotheek nu niet meer automatisch wordt geupdate moet je, om op je netwerk via DLNA / uPnP je media-files te zien, handmatig laten doorzoeken. Daar zit ik ook niet echt op te wachtenOp zondag 10 januari 2010 01:19 schreef Pwn_zoon het volgende:
omdat mijn Arcsoft Mediatheathre weigerde een legale DVD af te spelen, dacht ik: dan maar met Windows Media Player 11. Deze speelde inderdaad wel de schijf af.
Echter ratelde de harde schijf als een gek nog voor ik ook maar op play drukte.
wat bleek: rechtsonder in de hoek stond dat WMP alle MP3's, Video's en Foto's van mijn schijf aan het scannen was!
Dit terwijl ik bij de opties juist alles had uitgevinkt dat met de bibiotheek te maken had!
Dit is zeer hinderlijk als je veel muziek of foto's op je schij(f)(ven) hebt.
Nu blijkt dit een bekende bug te zijn van WMP, die ook al in versies 9 en 10 optrad.
Blijkbaar wil MS perse weten wat je allemaal op je hardeschijf aan media hebt.
Hieronder staat hoe je dit kunt uitschakelen:
ga via regedit naar:
HKEY_CURRENT_USER\Software\Microsoft\MediaPlayer\Preferences
en pas deze waardes aan:
LibraryHasBeenPopulated = 1
LibraryHasBeenRun = 1
TrackFoldersDirectories = 0
TrackFoldersUseRipDir = 0
en verwijder de mappen die er nog onder staan van muziek, videos, foto's etc.
open dan WMP en klik linksboven op: Bestand > Bibliotheken beheren
verwijder daar onder de catagorien muziek, foto's, tv en video de mappen van je harde schijf.
(nb: soms kan WMP vasthangen tijdens het scannen, sluit dan af en doe het opnieuw)
verander hierna naar de Weergave-mode (ctrl+2) en sluit het pogramma af.
voer nu in de opdrachtbalk (of verkenner) in:
%AppData%\Local\Microsoft\Media Player
en verwijder alle *.wmdb bestanden.
Vanaf nu kun je WMP eindelijk gebruiken zonder dat je harde schijf eerst een uur ratelt.
het is een netwerk printer. Hoe krijg ik dat ding aan het werk?
quote:Heb hier eigenlijk geen last van? Heb een redelijke grote muziekcollectie (15-20GB), maar hij indexeert eigenlijk nooit.?
[..]
Had 't zelfde probleem ook al ondervonden en ook deze oplossing gevonden, maar helaas werkt dat (voor mij in ieder geval) niet prettig. Doordat je media-bibliotheek nu niet meer automatisch wordt geupdate moet je, om op je netwerk via DLNA / uPnP je media-files te zien, handmatig laten doorzoeken. Daar zit ik ook niet echt op te wachten
quote:
quote:Goh, zou dit het goede topic zijn om je printerprobleem op te lossen?Op dinsdag 3 november 2009 09:33 schreef Godtje het volgende:
Waar is dit topic voor
* Het delen van tips, tricks en tweaks voor Windows 7 (en eventueel Vista maar vermeld dat dan even apart in de titel)
quote:dit forum is alleen om tips te plaatsen over Windows 7, je kunt die vraag het beste hier stellen:Op zondag 10 januari 2010 13:57 schreef Stienn het volgende:
Geen idee of dit het goede topic is, ik wil een printer toevoegen alleen loopt het spooler systeem vast.
het is een netwerk printer. Hoe krijg ik dat ding aan het werk?
Windows 7 #15 Net iets gelikter !
echter zul je wel wat meer info moeten geven, welke printer het is bijv
en heeft die wel windows 7 drivers van de fabrikant?
meestal kun je een alternatieve driver toevoegen via de add printer wizard, en dan zelf een TCPIP poort maken met het juiste IP adres.
quote:Ik heb nog een stap aan mijn stukje toegevoegd, je moet na het 'schoonmaken' nog 2 *wmdb bestanden op 'alleen-lezen' instellen. Daarna werken de Bibliotheken in de verkenner weer normaal. Kijk anders ook eens bij Services.msc of de Windows Media Player Network Sharing Service aanstaat?Op zondag 10 januari 2010 12:50 schreef kroegtijger het volgende:
Had 't zelfde probleem ook al ondervonden en ook deze oplossing gevonden, maar helaas werkt dat (voor mij in ieder geval) niet prettig. Doordat je media-bibliotheek nu niet meer automatisch wordt geupdate moet je, om op je netwerk via DLNA / uPnP je media-files te zien, handmatig laten doorzoeken. Daar zit ik ook niet echt op te wachten
[ Bericht 16% gewijzigd door Pwn_zoon op 10-01-2010 16:47:37 ]
However, showing and displaying of user accounts on the Welcome Screen is probably a weakness in the security point of view, more so if the user account is intended to be a hidden or backup user account. In fact, there is trick to make user account or administrator account that normally been listed on the Welcome Screen to be hidden from view.
In order to hide a user account (which also means create a hidden user account) in Windows XP, Vista, or Windows 7, just go to Control Panel User module and create an additional user as usually do (Control Panel -> User Accounts and Family Safety -> User Accounts in Windows 7 and Windows Vista). If you already have an existing user that wants to be made hidden, invisible or disappeared from Welcome Screen, then go straight to guide below.
1. Run Registry Editor (RegEdit.exe).
2. Navigate to the following registry key
HKEY_LOCAL_MACHINE\SOFTWARE\Microsoft\Windows NT\CurrentVersion\Winlogon\SpecialAccounts\UserList
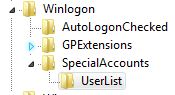
Note: If SpecialAccounts and UserList is not found, create new sub-key and name them accordingly.
3. Select UserList, and in the right pane, right click on any blank space, and point to New -> DWORD (32-bit) Value.
4. Name the new DWORD registry value name as the exact same name that match the name of the user account to be hidden.
For example, if the user ID of the user account is John, the name the registry value as John.
5. Double click on DWORD registry value, and set the value data to 0 in oder to hide the account from Welcome Screen.
Tip: To display the user account on Welcome Screen again so that it’s visible again, delete the registry entry, or set the value data to 1.
6. Exit Registry Editor.
7. Log off or restart computer to make the change effective.
Tip: In order to login into Windows using an user account that has made hidden and invisible, just press Ctrl+Alt+Del to bring up Windows Logon dialog, and then type in the user name and password manually.
Hoe groot Is Windows-7-Ultimate ? Is het veel kleiner dan Vista Proffessional ?
quote:Dit topic is voor tips. Voor vragen kan je het beste zijn in: Windows 7 #16
Vraag :
Hoe groot Is Windows-7-Ultimate ? Is het veel kleiner dan Vista Proffessional ?
quote:Zo even door de bank genomen is mijn Windowsfolder (van W7-U) ongeveer 6 GB.Op maandag 1 maart 2010 23:20 schreef quirigua het volgende:
Vraag :
Hoe groot Is Windows-7-Ultimate ? Is het veel kleiner dan Vista Proffessional ?
En dan bedoel ik dus niet in het standaard nvidia scherm.
Nu de keuze tussen 1024 of 800
Maar mijn tv geeft enkel normaal beeld, zonder blauwe schittering rond lichte objecten in het beeld, als hij op 712 of 768 staat.
Anyone?!
quote:Op maandag 1 maart 2010 23:22 schreef Godtje het volgende:
[..]
Dit topic is voor tips. Voor vragen kan je het beste zijn in: Windows 7 #16
quote:http://blog.hansmelis.be/(...)shares-in-windows-7/Those who have experience with NT-based operating systems on a network will certainly be familiar with the concept of administrative shares. If that doesn't ring a bell, you access them like \\computername\c$. With this intro and the title of this post, you might be alarmed or enter panick mode fearing they might be gone in Microsoft's latest OS iteration. Well don't go into cardiac arrest because they are still there... but of course not without the odd problem.
Windows 7 still creates the administrative shares on install, but you can't use them out of the box. First of all, you need to have File and Printer Sharing enabled. And the way to do that has once again been changed:
1. Open the control panel.
2. Go to Network and Internet.
3. Go to Network and Sharing Center.
4. In the left column, click on Change advanced sharing settings.
5. There are two profiles. You probably don't want this on when you're on a public network so open Home or Work.
6. Under the header File and Printer sharing, select the Turn on... option.
And now your administrative shares still don't work :-P You've just completed step 1 which implies there's at least a step 2 and here it is: you also need to change the registry.
1. Click on the orb (= the round button with the Windows logo in the taskbar) and type regedit in the search box.
2. Open the registry editor.
3. Navigate all the way to HKEY_LOCAL_MACHINE\SOFTWARE\Microsoft\Windows\CurrentVersion\Policies\System.
4. Right-click in the pane on the right side and add a new DWORD (32-bit).
5. Give the new setting the name LocalAccountTokenFilterPolicy.
6. Double click on that setting and give it a value of 1.
It's probably wise to reboot after doing this, although it might not be needed. I'm not sure if it works straight away because I rebooted without trying.
Anyways, if you're lucky you will be able to access administrative shares after performing these steps. If you're unlucky, like me, doing all these things appears to have zero effect at all. Once again don't panick, because there's another hint/tip/solution coming your way.
Somewhere at some point during the installation or configuration of Windows 7, you will be asked to do something with a thing called Homegroup. It's some weird new sharing tool that looks OK but isn't quite what you're used to. Once you have enabled that feature, you won't be able to use the administrative shares. So the tip is: disable the homegroup feature.
1. Open the control panel.
2. Go to Network and Internet.
3. Go to HomeGroup.
4. Click on the blue link Leave the homegroup.
The popup dialog should point out itself, but I believe I picked to first option. Once I had left the homegroup, the administrative shares started working again.
dit is een klein programmaatje wat dus meerdere programma's kan bundelen in 1 taskbaricon. Het zelfde idee als de stacks van mac osx. (zie afbeelding) Handig om bijvoorbeeld al je games samen te voegen. Of bijvoorbeeld de hele office suit of alle adobe programma's, wat je zelf wil. Je kan ook nog kiezen tussen verschillende soorten weergaven.
Software werkt goed, zelf getest.. virusvrij volgens NOD32 versie 4. En er blifjt geen proces draaien op de achtergrond, het proces start razendsnel op en sluit meteen weer af als je gebruik maakt van het menu.
Veel opties en niet ingewikkeld.
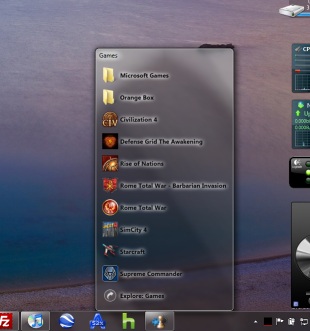

http://www.alastria.com/index.php?p=software-7s